Adding Subcategories
You can add subcategories to existing categories.
Add Subcategories
- Click Settings & Tools > Content Setup, and then click Categories.
- If multiple sites exist, select a site containing the category you want to add subcategories to.
- Click the top-level category or the subcategory under which you want to create a new subcategory.
- Click New, and then click New Subcategory.
- In the Add Subcategory pane, do the following:
- For Name, type a name for the subcategory.
- For Reference ID, the field auto-fills with the subcategory name. You can change the reference ID but be aware that it must be unique among all category and subcategory IDs.
- For Description, type a description of the type of content item that should be added to this subcategory using the formatting options available in the rich text editor toolbar.
- Click Add. The new subcategory appears in the Categories box. To remove an added subcategory, click it, and then click
 .
.Note: You can click one of the already added subcategories in the Categories box to change that subcategory's properties. When you finish making changes, click OK to save them.
- When you are finished adding subcategories, click Save.
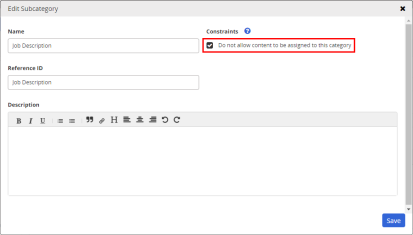
- (Optional) Under some circumstances, you may not want a subcategory you've added to be assigned to content items. For example, if you are creating multiple levels of subcategories, a subcategory may simply be a container for other subcategories added below it. To prevent a subcategory from being assigned, find and click the subcategory in the category tree, select Do not allow content to be assigned to this category, and then click Save.
-
Click Save.
This publication was written and produced at NAVEX Global, Inc., Lake Oswego, Oregon. This publication or any portion thereof is confidential and/or proprietary and may not be reproduced or used in any manner whatsoever without the express written permission of NAVEX Global, Inc.
Copyright © 2026 NAVEX Global, Inc. NAVEX Global® is a registered trademark/service mark of NAVEX Global, Inc. The NAVEX Global® logo is a trademark/service mark of NAVEX Global, Inc. Unauthorized use of NAVEX Global, Inc.’s trademarks/service marks is strictly prohibited without prior written permission from NAVEX Global, Inc.