Exporting Reports
You can save up to five automated report export configurations. Setting up an export consists of adjusting general settings, providing SFTP server information, and setting a recurring export schedule. Recurring export of report data automatically generates an export file and sends it to a specific SFTP server. Aside from scheduled report exports, you can export report data manually to a file on your local drive at any time.
Important: The option to automate exporting of reports requires the use of a NAVEX SFTP Server. You must contact NAVEX Customer Support by submitting a request in the Community for assistance with the setup for this configuration.
Create a Report Export File on a Schedule
-
Click Settings & Tools > Tools, and then click Data Exports.
-
In the Reports Export pane, click New Data Export.
-
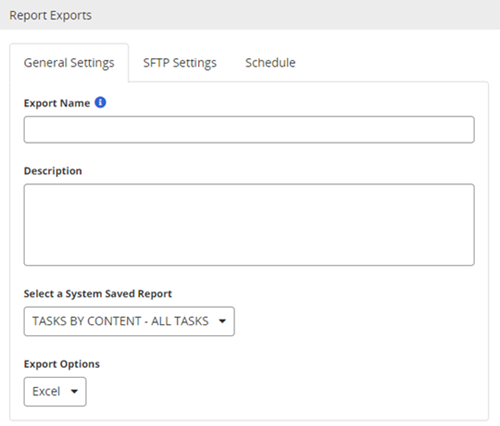
On the General Settings tab, do the following:
-
In the Export Name box, type a unique name for the export file.
Note: Because the Export Name is part of the export file name, use only characters allowed in file names. Unsupported characters are the following, but are not limited to: @ $ % & \ / : * ? " ' < > | ~ ` # ^ + = { } [ ] ; !
-
(Optional) In the Description box, type a description for the export.
-
In the Select a System Saved Report list, select a report name.
-
In the Export Options list, select Excel or CSV (comma-separated values) file format.
Note: Only columns visible in the Data section of the Saved Report configuration will be exported.

-
-
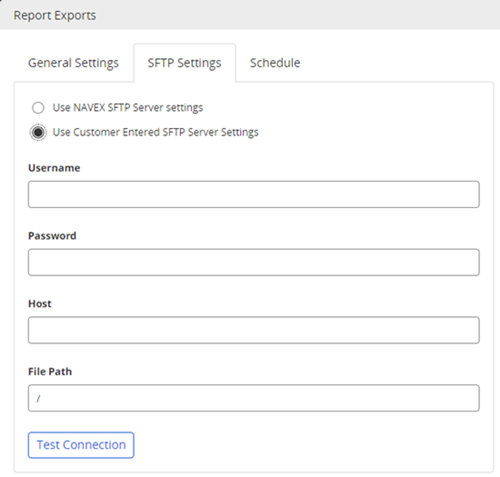
Click the SFTP Settings tab, and then do one of the following:
-
Select Use NAVEX SFTP Server settings, and then enter the File Path field value.
-
Select Use Customer Entered SFTP Server Settings, and then you must enter the Username, Password, Host, and File Path field values.

Note: As the administrator of Policy & Procedure Management you are responsible for all SFTP server settings.
-
-
Click Test Connection to validate the connections settings.
-
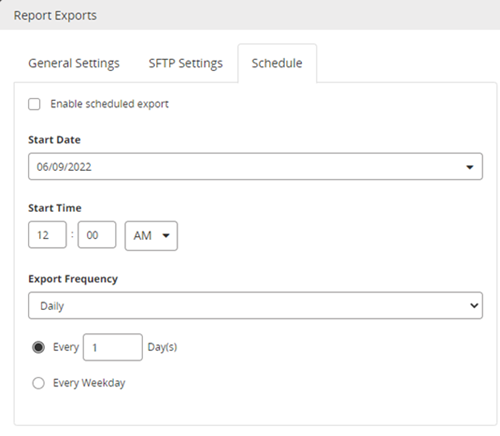
Click the Schedule tab, and do the following:
-
(Optional) Select Enable schedule export to allow a scheduled export.
-
For Start Date, type a date or click
 , and in the calendar select the date you want the export to start.
 -
For Start Time, type the hour and minute, and then click PM or AM.
-
For Export Frequency, click Daily, Weekly, Monthly, or Yearly, and then select the applicable conditions.

-
-
Click Save.
Note: The administrator will receive an email if the export is unsuccessful.
Create a Report Export File Manually
You can export report data directly to a file on your local drive at any time.
-
Click Settings & Tools > Tools, and then click Data Exports.
-
In the Reports Export pane, click New Data Export.
-
On the General Settings tab, do the following:
-
In the Export Name box, type a unique name for the export file.
Note: Because the Export Name is part of the export file name, use only characters allowed in file names. Unsupported characters are the following and not limited to: @ $ % & \ / : * ? " ' < > | ~ ` # ^ + = { } [ ] ; !
-
(Optional) In the Description box, type a description for the export.
-
(Optional) In the Select a System Saved Report list, select a report name. (See Using System Saved Reports for more information).
-
In the Export Options list, select Excel or CSV (comma-separated values) file format.
-
-
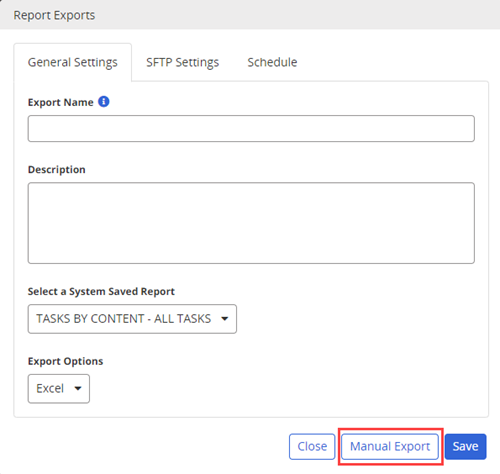
Click Manual Export. The file saves to your Downloads folder.

-
Click Close.
Edit a Report Export File
You can modify the setting of an existing report export file.
-
Click Settings & Tools > Tools, and then click Data Exports.
-
Expand the Reports Export pane.
-
Click the name of the export file for which you want to modify.
-
As needed, edit any of the settings. When scheduled, the export runs with the new settings.
-
Click Save.
Copy a Report Export File
You can create a copy of an existing report export file. The system stores the copy in My Saved Reports.
-
Click Settings & Tools > Tools, and then click Data Exports.
-
Expand the Reports Export pane.
-
Click
 next to the name of the file for which you want to make a copy.
 -
If needed, edit any of the settings.
-
Click Save.
Delete a Report Export File
If you do not want to retain an export file of a report, you can delete it.
-
Click Settings & Tools > Tools, and then click Data Exports.
-
Expand the Reports Export pane.
-
Click
 next to the name of the file you want to delete, and then click Yes to confirm.