Exporting Tasks
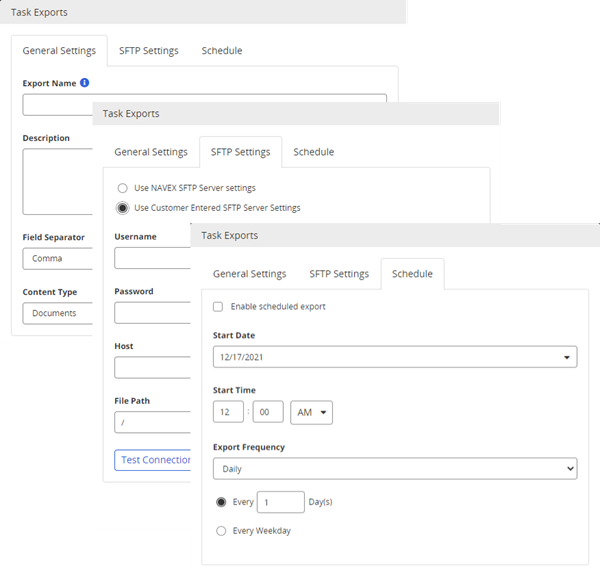
You can define up to three separate instances of task completion export data for document, assessment, or campaign content types. The first export in the series contains all task completion data for the selected content type. Subsequent exports contain only new or changed data. Setting up an export consists of adjusting general settings, providing the required SFTP server information, and setting a recurring export schedule. Recurring export of task completion data automatically generates an export file and sends it to a specific SFTP server. If you choose not to use the NAVEX SFTP server (default) or your own SFTP server, you can export task completion data manually to a file on your local drive at any time.
Important: You must contact NAVEX Customer Support by submitting a request in the Community for assistance with the SFTP connection configuration.
Create a task export file on a schedule
- Click Settings & Tools > Tools, and then click Data Exports.
- In the Tasks Export pane, click New Data Export.
- On the General Settings tab, do the following:
- In the Export Name box, type a unique name for the export file.
Note: Because the Export Name is part of the export file name, use only characters allowed in file names. Unsupported characters are the following, but are not limited to: @ $ % & \ / : * ? " ' < > | ~ ` # ^ + = { } [ ] ; !
- (Optional) In the Description box, type a description for the export.
- In the File Separator list, select comma-separated (.csv), tab, or pipe delimited (.txt) format.
- In the Content Type list, select Documents, Assessments, or Campaigns.

- In the Export Name box, type a unique name for the export file.
-
Click the SFTP Settings tab, and then do one of the following:
-
Select Use NAVEX SFTP Server settings, and then you enter the File Path field value.
-
Select Use Customer Entered SFTP Server Settings, and then you must enter the Username, Password, Host, and File Path field values.
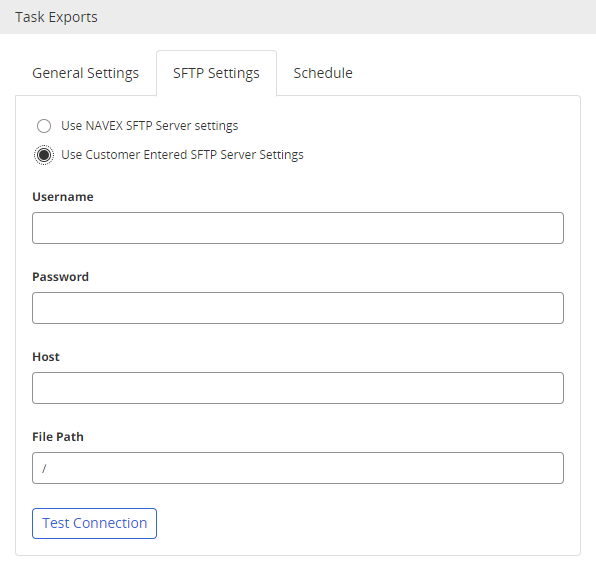
Important: As the administrator of Policy & Procedure Management you are responsible for all SFTP settings.
-
-
Click Test Connection to validate the connections settings.
-
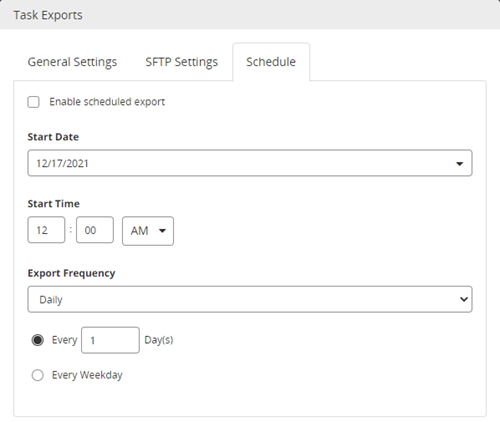
Click the Schedule tab, and do the following:
-
(Optional) Select Enable schedule export to allow a scheduled export.
-
For Start Date, type a date or click
 , and in the calendar select the date you want the export to start.
 -
For Start Time, type the hour and minute, and then click PM or AM.
-
For Export Frequency, click Daily, Weekly, Monthly, or Yearly, and then select the applicable conditions.
-
-
Click Save.
Note: The administrator will receive an email if the export is unsuccessful.
Create a task export file manually
You can export task completion data directly to a file on your local drive at any time.
-
Click Settings & Tools > Tools, and then click Data Exports.
-
In the Tasks Export pane, click New Data Export.
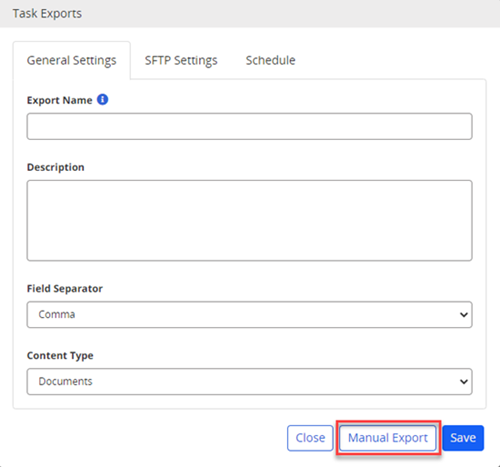
- On the General Settings tab, do the following:
- In the Export Name box, type a unique name for the export file.
Note: Because the Export Name is part of the export file name, use only characters allowed in file names. Unsupported characters are the following and not limited to: @ $ % & \ / : * ? " ' < > | ~ ` # ^ + = { } [ ] ; !
- (Optional) In the Description box, type a description for the export.
- In the File Separator list, select comma-separated values (.csv), tab, or pipe delimited (.txt) format.
- In the Content Type list, select Documents, Assessments, or Campaigns.
- In the Export Name box, type a unique name for the export file.
-
Click Manual Export.
-
In the Alert box, click OK. The file saves to your Downloads folder.
-
Click Close.
Edit a task export file
You can modify the setting of an existing task export file.
-
Click Settings & Tools > Tools, and then click Data Exports.
-
Expand the Tasks Export pane.
-
Click the name of the export file for which you want to modify.

-
As needed, edit any of the settings.
-
Click Save. When scheduled, the export runs with the new settings.
Copy a task export file
You can create a copy of an existing task export file.
-
Click Settings & Tools > Tools, and then click Data Exports.
-
Expand the Tasks Export pane.
-
Click
 next to the name of the export file for which you want to make a copy.
-
If needed, edit any of the settings.
-
Click Save.
Delete a task export file
If you do not want to retain an export file of task completion data, you can delete it.
-
Click Settings & Tools > Tools, and then click Data Exports.
-
Expand the Tasks Export pane.
-
Click
 next to the name of the export file you want to delete, and then click Yes to confirm.
This publication was written and produced at NAVEX Global, Inc., Lake Oswego, Oregon. This publication or any portion thereof is confidential and/or proprietary and may not be reproduced or used in any manner whatsoever without the express written permission of NAVEX Global, Inc.
Copyright © 2026 NAVEX Global, Inc. NAVEX Global® is a registered trademark/service mark of NAVEX Global, Inc. The NAVEX Global® logo is a trademark/service mark of NAVEX Global, Inc. Unauthorized use of NAVEX Global, Inc.’s trademarks/service marks is strictly prohibited without prior written permission from NAVEX Global, Inc.