Setting Default General Properties
The General Properties tab in Default Properties > Content Setup provides default settings for general properties, such as reference number, comments and notifications, review interval, workflow, and display options for new content items.
Refer to the following topics when working with settings on the General Properties tab.
Every content item created in Policy & Procedure Management must have a reference number as a unique identifier. The Reference # setting allows you to choose between Policy & Procedure Management automatically assigning reference numbers to documents and assessments or having content owners enter the reference numbers.
One situation where you might want to let content owners fill in the reference number is if you will be importing documents and want to keep the same numbering system used previously outside of Policy & Procedure Management. It is important to decide about how content items will be numbered before creating or importing any content.
Note: Reference number settings apply only to Documents and Assessments. Campaign reference numbers are always automatically generated.
-
Click Settings & Tools > Content Setup, and then click Default Properties.
-
On the General Properties tab, in the Reference # section, do one of the following:
-
Select Auto Number to have Policy & Procedure Management automatically number each new or imported content item. If you want the numbering to start at a number other than 1, type that number in the Auto Number box.
Note: An automatically assigned reference number cannot be changed.
-
Select User Fills In. If you import documents with this setting on, Policy & Procedure Management still assigns a reference number, but the document owner can change it.
Note: The User Fills In option applies to documents and assessments only.
-
-
Select View titles with their reference numbers to have the reference number displayed with the content item title in various Policy & Procedure Management contexts. The reference number is shown in parentheses before each content item title.
-
Click Save.
The Comments/Discussions and Notifications settings controls who can create discussions in approved content items and send messages to owners of those items.
-
Click Settings & Tools > Content Setup, and then click Default Properties
-
On the General Properties tab, in the Comments/Discussions and Notifications section, do any of the following:
-
Select Restrict discussion creation on approved content to owners, proxy authors and administrators to turn off the Discussions feature in approved content items for all but owners, proxy authors, and administrators.
-
Select Disable the Send Message to Owner option in content to hide the Send Message to Owner option in approved content items.
-
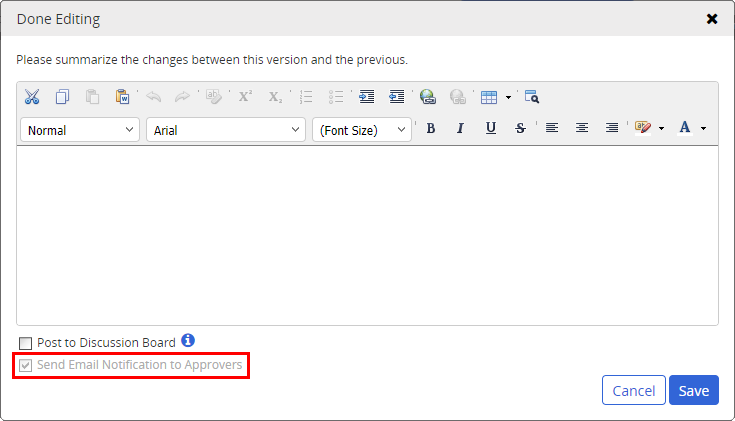
Select Send Email Notification to Approvers to have this option checked by default when an administrator edits an approved document or assessment in its current state. When an administrator is done editing, the window shown below appears for the administrator to describe the changes made. If you select Send Email Notification to Approvers, the option cannot be changed when the administrator sees the Done Editing window.

-
-
Click Save.
The Review Interval setting controls how often you review a content item. What you enter will be the default review interval for all new content item templates. With a review interval set, a content item's owner receives a review task with a due date as soon as the current date falls within the selected warning period.
Note: An administrator can change the default review interval for a template in the Properties Wizard.
-
Click Settings & Tools > Content Setup, and then click Default Properties.
-
On the General Properties tab, in the Review Interval section, do the following:
-
For Review Interval Months, type a number of months between reviews. The default is every 12 month(s) from last reviewed date.
-
For Months to warn before document is due for review, type a number of months before the review interval due date that you want owners notified that a review is approaching.
Note: Policy & Procedure Management starts counting months when a content item is approved.
-
-
Click Save.
The Workflow settings allow you set options for certain content items.
-
Click Settings & Tools > Content Setup, and then click Default Properties.
-
On the General Properties tab, in the Workflow section, do any of the following:
-
Select Disable No Revision Necessary, to remove the No Revision Necessary option from the Options menu. Then, the only way an owner can complete an assigned review task is to create a new version and have it approved.
When creating a template for documents, assessments, or campaigns, an administrator has the option of assigning a review internal for all content items created from that template. The owner also has the option of changing or setting a review interval when creating a content item.
With a review interval set, a content item's owner receives a review task with a due date as soon as the current date falls within the selected warning period. The expected workflow is that the owner would review the content item and then create a new version with any needed changes. The new version would then be submitted into the normal review and approval process and replace the previous version once the new version is approved.
By default, the owner (or administrator) has the option of indicating that a content item due for review does not need to be updated by clicking No Revision Necessary in the More menu. This removes the task from the owner's list and resets the periodic review date out the currently set number of months.

-
Select Original Text as Default, if you want the new version of the original content copied into the Edit Document and Edit Assessment tabs of each copy's new version instead. This option is especially useful if you want to ensure that the contents of a new version of the original document/assessment is retranslated for or pushed into each of its copies.
Note: This option applies only to document and assessment content types and only if the Localization Workflow module is in use.
When a new version of an original document or assessment is approved, new versions of the localized copies are automatically put in draft status. By default, the contents in the Edit Document and/or Edit Assessment tabs of a copy's new version are the same as the copy's previous version contents. The localized copy owner can then compare the copy's contents to the new version of the original document and make changes to the new version of the copy as needed.
Important: Using this option overwrites in the copies whatever changes may have been made to the original document and assessment text, such as translations or localized content, in the previous version of those copies. However, the previous version of the copies are available in the Version History page of each copy's Overview for comparison purposes.
-
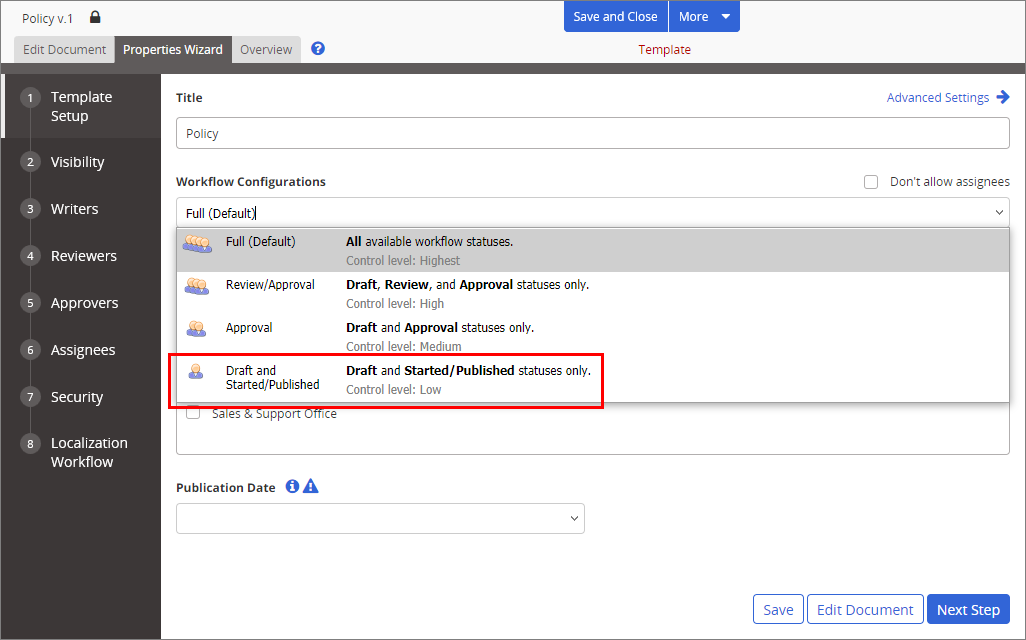
Select Allow Templates to use the Draft and Started/Published workflow configuration, to enable the removal of the Approved status.
By default, an administrator or a user with the Template role can choose from the following workflow configurations when setting up a document or assessment template: Full (includes Draft, Collaboration, Review, and Approval statuses prior to publication), Review/Approval (removes the Collaboration status), Approval (removes the Collaboration and Review Statuses).
Note: This option applies only to the document and assessment content types. (Campaigns always use the Draft and Started/Published workflow configuration, which cannot be changed.)

-
Select Use External Review Date as Last Approved Date, so any document that includes an External Review Date value will show two approval dates in its Overview—Date Approved and System Date Approved. Date Approved will be the same as the External Review Date value, and System Date Approved will be the date when the document was approved and moved to Pending or Published status in Policy & Procedure Management. System Date Approved will also be available as an optional column in reports and in the Browse grid.
Note: This option applies only to the document content type.
This setting is especially useful when importing or uploading documents, and those documents were previously approved outside of Policy & Procedure Management. By default (when this setting is not selected), the approval date shown for any document is the date the document was approved within Policy & Procedure Management and moved to the Pending or Published status. Select this option if you want the date provided (if one is provided) for each document's External Review Date setting displayed as the approval date instead.
Note: If this setting is cleared after being selected for a time, all approval dates will revert to the Policy & Procedure Management approval date.
-
Select Enable Task Completion by Proxy to allow managers, owners, and administrators to complete tasks by proxy for assignees.
-
Select Auto Create Prepare Task on New Document to create a new task for the content owner when a new document is created.
Any text entered in the open text field will appear in the task Description, the content item Owner Instructions, and the Localization Workflow Instructions field.
Note: Document owners can modify the default text for each individual content item within those specified fields.
-
-
Click Save.
The Display Options settings allow you to control how content items display.
-
Click Settings & Tools > Content Setup, and then click Default Properties.
-
On the General Properties tab, in the Display Options section, do any of the following:
-
Select Display the path of a subcategory before its name if you want subcategory paths to look like the one below.

When a content item (document, assessment, or campaign) is assigned to a subcategory, that subcategory name can appear in several locations where content information is displayed. In addition to the subcategory name, the top level category name and any parent subcategory names are also displayed.
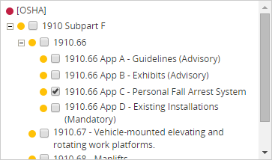
For example, imagine that the subcategory 1910.66 App C - Personal Fall Arrest System is assigned to a document from the following category-subcategory structure:

Notice that the top-level category name is OSHA and that the selected subcategory is under the subcategory 1910.66, which in turn is under the subcategory 1910 Subpart F. This subcategory structure can be expressed as a path, like a file structure path, with slashes separating subcategory levels, as follows:
1910 Subpart F/1910.66/1910.66 App C - Personal Fall Arrest System
By default, a subcategory path is shown in parentheses after the assigned subcategory name, as shown in the Categories section of a document's Properties page of the Overview below.

-
Select Allow all users to view the overview, if you want all users to see the Overview, regardless of their role assignment. By default, the Overview tab is hidden in content items opened by users with only the Assignee role.
-
Select Allow users to see the Cross-System URL in the Overview to show a special, cross-system URL in the Properties page of each document's Overview tab.
The cross-system URL can be copied and pasted into documents in another Policy & Procedure Management system (separate installation) to link back to the item in this Policy & Procedure Management system. Cross-system links are not tracked and are therefore never updated when the linked item changes. These links also do not appear in an item’s Links page of the Overview.
-
Select Allow users to see Evergreen link to display Evergreen link for Documents and Assessments on the Overview page. Evergreen links also appear in content grids and Content Details Reports. These URLs are permanent links based on the Reference Number and remain unchanged, even when the content item is updated to a new version.
-
Select Allow Evergreen link to be inserted via PT Tools to allow the Evergreen links to be inserted through PT Tools.
-
-
Select Show Change Summary by default with Task Instructions to enable the Change Summary field for all content items.

If this check box is not selected, the owner can enable this field for each individual content item in the Assignee Task Settings tab under Properties Wizard.
-
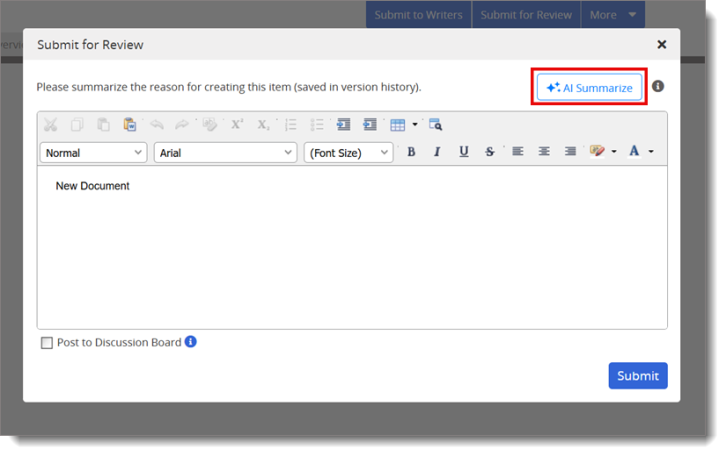
Select Enable AI Summarization to activate the AI Summarize feature. This feature allows Document Owners to quickly generate a draft of the Change Summary text using AI when submitting a document for review, approval, or setting as approved.
Important: This feature is available in Professional and Enterprise subscriptions.
The AI generated text provides a summary of the differences between the previous and new versions of the document. Document Owners can accept, edit, or decline the AI generated summary as needed. The AI Summarize button is available only for documents containing a maximum of 25,000 characters (approximately 15 pages of text).

Documents created in different languages within the Policy & Procedure Management application display a draft AI summary in the same language as the document.
Note: If the document exceeds the character limit, the AI Summarize button is grayed out.
-
-
Click Save.