Setting Up Incident Management with Policy & Procedure Management
Note: The following instructions are for setting up integration within Policy & Procedure Management. See Incident Management Help documentation for the application integration setup instructions.
Define an Issue Type Category
Part of the integration functionality is syncing Incident Management issue types with Policy & Procedure Management categories. You need to define a top-level category, such as one called Issue Types, that will hold the issue type categories that will be created with the initial sync and then updated whenever a sync is performed thereafter.
Important: To avoid site mismatches between categories and case managers, you should make the category available to all sites and then assign the case manager permission to users at specific sites.
Set Product Integration Preferences
- Click Settings & Tools > IT Settings, and then click Product Integration.
Important: The Product Integration option is available only after case management integration has been enabled.
- In the Incident Management section, for Report Incident URL type the web address for reporting an incident in Incident Management. This is so Policy & Procedure Management users can report an incident when reading a policy document that has been assigned an Incident Management issue type category.
- In the Web Service Connection Settings section, do the following:
- For Web Service URL, type the URL for the Incident Management web service.
- For Username and Password, type a user name and password for logging in to the server hosting the Incident Management web service.
- Click Save and Test Connection. After a few moments, Connection Status should change to Connected. If the connection fails, troubleshoot the connection settings, and try again until the connection is made.
- In the Issue Type Synchronization section, do the following:
- For Daily Synchronization Time, select the time each day when you want to sync Incident Management issue types with their corresponding Policy & Procedure Management categories.
- For Sync to Category, select the category you created to store Incident Management issue types.
- Select Activate Synchronization, and then click Save.
- (Optional) Click Synchronize Now to create the issue type subcategories.
Assign the Case Manager Permission
The case manager permission enables a user to request that a document be updated. To assign one or more users as case managers, do the following:
- Click Settings & Tools > User Setup, and then click User Manager.
- Open a user profile, and click the System Permissions tab.
- In the Sites list, click All Sites (Global Permissions) or an individual site.
- In the Available Permissions box, select Case Manager.
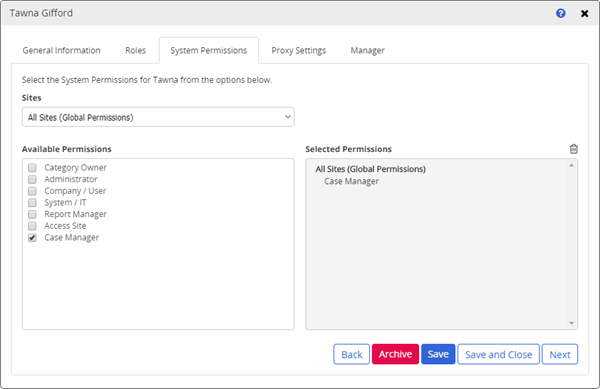
- Click Save and Close.
This publication was written and produced at NAVEX Global, Inc., Lake Oswego, Oregon. This publication or any portion thereof is confidential and/or proprietary and may not be reproduced or used in any manner whatsoever without the express written permission of NAVEX Global, Inc.
Copyright © 2026 NAVEX Global, Inc. NAVEX Global® is a registered trademark/service mark of NAVEX Global, Inc. The NAVEX Global® logo is a trademark/service mark of NAVEX Global, Inc. Unauthorized use of NAVEX Global, Inc.’s trademarks/service marks is strictly prohibited without prior written permission from NAVEX Global, Inc.