Localizing a Synced Assessment
If the localized copy you are working with has been synced with its original and the original is a document that includes an assessment or is a stand-alone assessment, the copy has inherited the original's assessment contents. You can localize (translate or otherwise modify) the text for the following assessment elements:
- Section headings
- Questions
- Answers
- Question feedback
- Assessment introduction
Important: If you are translating an assessment, be sure to replace assessment text with exact translations so that the integrity of reports that include assessment results is maintained.
You can also change an answer's advanced settings or disable the assessment altogether.
You cannot make any of the following changes:
- Add or delete a section
- Add or delete a question
- Change a question's type
- Move a question to a different section
- Change answer settings (whether only one or any answer is acceptable, which is the correct answer)
- Change any settings on the Assessment Settings page, except for Assessment Introduction and Disable Assessment.
You can localize a synced assessment by either editing it directly in the Edit Assessment tab of the copy document or by preparing and importing an Excel file that the original owner has exported and sent to you.
- Open the localized copy of the document or assessment while it is in the Draft, Collaboration, Review, or Approval status.
Note: In a document/assessment list, a localized copy title is preceded by an up arrow (↑).
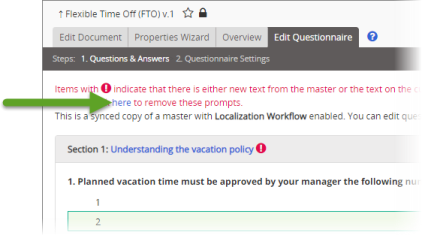
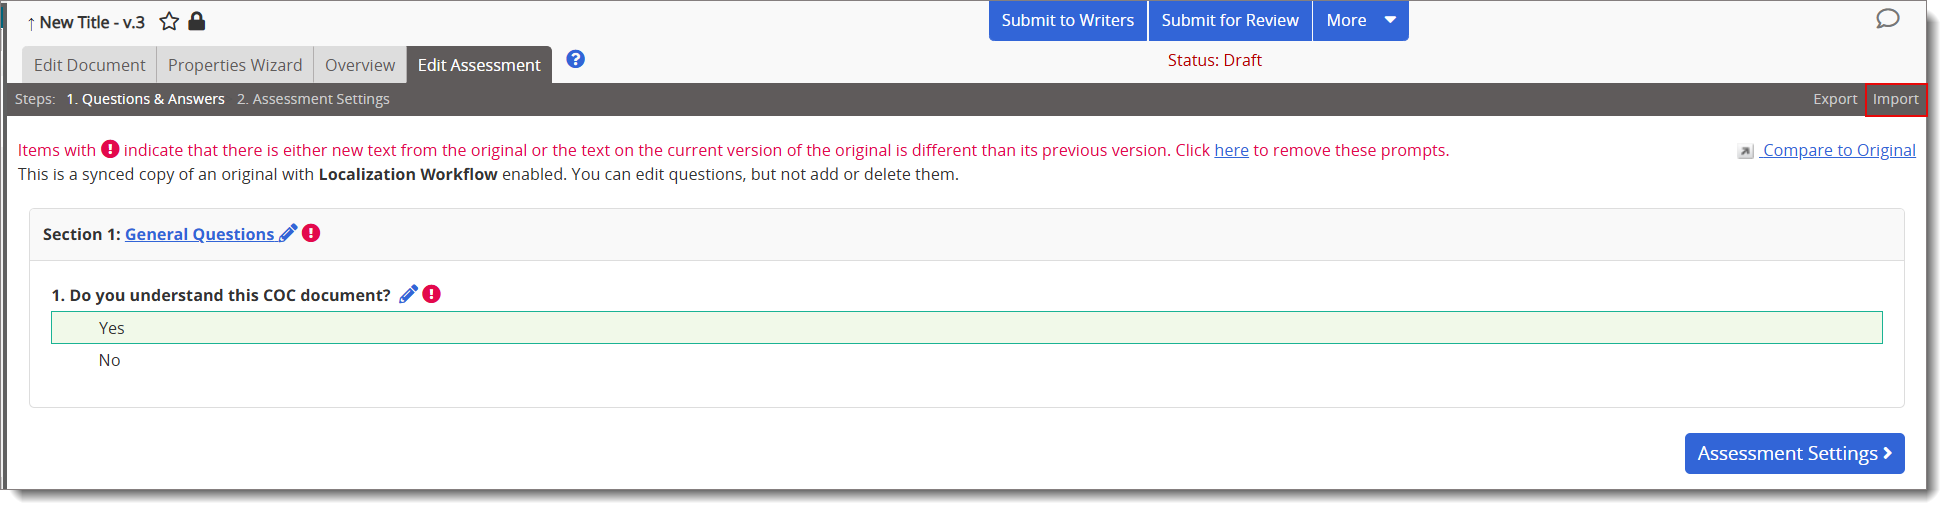
- Click the Edit Assessment tab. The assessment appears exactly as it was created in the original, with the exception that the
 alert appears next to each piece of text that can be considered for localization (be translated or otherwise modified for your location).
Notes:
- The alert is hidden for a specific piece of text once it is modified in any way and no longer matches the text in the original assessment.
- At any time while working on the assessment you can click Compare to Original to open the original assessment in a separate browser window.
- To clear all alerts, click the here link in the alert at the top of the assessment.
- The
- To localize section heading text, click the text in a section heading, make needed changes, and then click Save.
- For each question you need to localize, click
 after the question text, and then do any of the following:
- Localize the Question text.
- If this is not an open-ended question, localize the text for each answer.
- For each answer, click Options, click Advanced Settings, make changes to the Create Exception and Create Task settings, and then click Save.
- If feedback has been enabled, localize the Feedback text.
- Under Section, click
 , localize the section text, and then click Save.
- Click Save and Close.
- Click Assessment Settings, and then localize the Assessment Introduction text.
- Click Save.
- Find and open the assessment translation file that the original owner sent or gave you access to.
Note: The name of an assessment translation file (an Excel file) is in the following format: [document ID]_[language code]_QuestionaireForTranslationExportFiles_[year, month, hour, minute, second].xls. For example:371_fr-FR_QuestionaireExportForTranslationFile_2014_09_30_10_06_40.xls.
The contents of the file will look similar to those shown below.
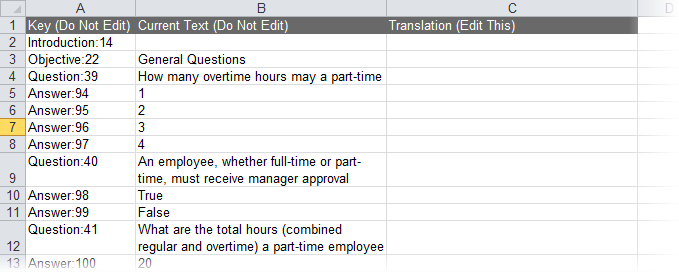
- In the Translation (Edit This) column, type the translations for or modifications of the text in the Current Text (Do Not Edit) column. To use a piece of current text as it is, leave its corresponding translation cell empty.
Note: The spreadsheet is protected so that you do not accidentally make changes to the text in the first two columns.
- When you are finished adding translations or modifications, save the file.
- Open the localized copy with the assessment that corresponds with the translation file you prepared.
- Click Edit Assessment, and then, near the upper right corner of the window, click Import.
- Click Browse, find and click the translation file, and then click Open to add the file name to the Import Assessment box.
- Click Import, and then, when the process has finished, click OK.
Note: If you ever need to modify the imported text, you can either change it directly in the Edit Assessment tab, or you can export it using the Export option in the localized copy, make the needed changes, and then re-import it.
This publication was written and produced at NAVEX Global, Inc., Lake Oswego, Oregon. This publication or any portion thereof is confidential and/or proprietary and may not be reproduced or used in any manner whatsoever without the express written permission of NAVEX Global, Inc.
Copyright © 2026 NAVEX Global, Inc. NAVEX Global® is a registered trademark/service mark of NAVEX Global, Inc. The NAVEX Global® logo is a trademark/service mark of NAVEX Global, Inc. Unauthorized use of NAVEX Global, Inc.’s trademarks/service marks is strictly prohibited without prior written permission from NAVEX Global, Inc.