Using Custom Print
The Custom Print feature uses a different method of selecting documents (not the document list) and offers more options for what to print.
Important: This print option applies only to Word and Excel documents and are not available for assessments or campaigns.
Use Custom Print
- Use Search or Browse to find the documents you want to print.
- In the Documents grid, click
 , and then click Custom Print.
 - Set the options for the documents you want to print, and then do one of the following:
- To start the automated printing of the selected documents, click Print Documents.
- To change one or more report settings, click Next.
Important: By default, only documents assigned the All Users (default) security level are displayed in the Available Documents box. To display and have the option to select documents assigned the Restricted - High or Restricted - Severe security level, click Show Restricted Documents. Restricted document titles are displayed in red font.
-
the Print Options box, select one of the following outputs for the selected documents:
Option Description Additional Options Description Print Documents Automatically opens and prints all selected documents. You can choose to keep original paging or include continuous page numbers across all pages. Properties (More) After selecting this option, select More to add cover pages and additional properties. Document This option prints the document. Uploaded Attachments This option prints only attachments uploaded to Policy & Procedure Management. Documents attached as links will not print. Print Display Table Adds or removes columns and changes how the table sort currently displays in the Arrangement area. Standard This option creates a report containing the document list. Microsoft Excel Raw This option exports the list to an Excel (.xls) file. Arrangement By default, the document sort order in the report is ascending by Title. To change what the documents are sorted by, click a different column header. Click the same column header again to reverse the sort order.
To change which columns of information is in the printed output, click Show/Hide Columns, and then select or clear what you want added or removed.
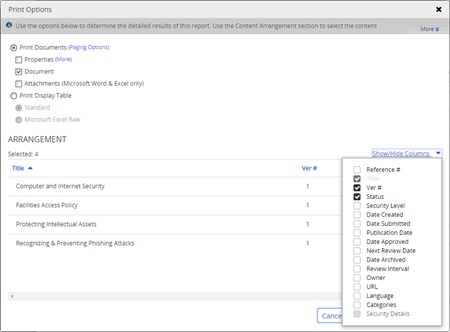
Note: Security Details option functions differently than the other Show/Hide Columns options. First, it is only selectable if Microsoft Excel Raw is selected. Second, it causes two columns to be added to the display table: Allowed Access Type and Allowed Access. These two columns will contain information only for documents that have the Restricted - High or Restricted - Severe security level assigned, and only if one or more other allowed users are selected. The Allowed Access Type column shows how other allowed users were selected (by department, by job title, or by assignees), and the Allowed Access column shows the departments, job titles, and assignees that were selected.
- Do one of the following, depending on what output you have selected in the Print Options box.
- For the Print Documents option, click Print Documents to start the automated printing of the selected documents.
- For the Print Display Table option, click View Report. If Standard is currently selected, the report opens in a separate browser window. If you selected Microsoft Excel Raw, follow the prompts to open or save the display table file.
Important: Policy & Procedure Management opens and prints each selected document one after the other. This may take several minutes if many documents are selected. Do not attempt to work with any open document until the printing process has finished.
-
The last item to print is the table of contents. When the Printing Complete box appears, do one of the following:
-
Click OK to edit the table of contents making changes as you would with any other Word document within Policy & Procedure Management. When finished, print the modified table of contents from within Word.
-
Click Cancel to use the default table of contents.
-
This publication was written and produced at NAVEX Global, Inc., Lake Oswego, Oregon. This publication or any portion thereof is confidential and/or proprietary and may not be reproduced or used in any manner whatsoever without the express written permission of NAVEX Global, Inc.
Copyright © 2026 NAVEX Global, Inc. NAVEX Global® is a registered trademark/service mark of NAVEX Global, Inc. The NAVEX Global® logo is a trademark/service mark of NAVEX Global, Inc. Unauthorized use of NAVEX Global, Inc.’s trademarks/service marks is strictly prohibited without prior written permission from NAVEX Global, Inc.