How you set up PDF Converter depends on whether your PolicyTech site is hosted by NAVEX Global or is installed on your organization's premises.
Complete the following steps before installing PDF Converter.
PolicyTech uses a third-party application—Neevia Document Converter Pro—to convert Word documents to PDF. You'll be downloading and installing Document Converter Pro in a later step, at which time you'll be prompted for a serial number to activate the application.
If you're newly adding PDF Converter to an existing PolicyTech site or migrating your PolicyTech site to a new server, contact Client Support at 888-359-8123 (toll-free in the U.S. and Canada) or 208-359-8123 to obtain a Document Converter Pro serial number.
If you're reinstalling PolicyTech on the same server, use the serial number from the previous Document Converter Pro installation. If you don't know that serial number, contact Client Support at one of the numbers listed above to retrieve it.
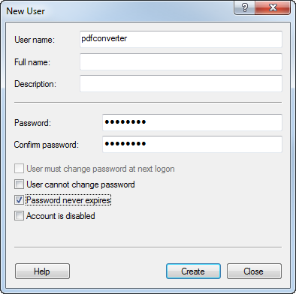
On the computer where PDF Converter will be installed (usually the server where the PolicyTech website is installed), you need to create an administrator user account that will be used by PDF Converter.
Note: PDF Converter should not be installed on a server that is an Active Directory domain controller.


PDF Converter requires access to a working copy of Word 2007 or later on the computer where PDF Converter is installed.
If you're reinstalling Document Converter Pro, you can avoid having to enter configuration settings for your new installation by copying the configs folder from your previous Document Converter Pro directory structure to the desktop or other easily accessible file system location.
The default folder path is C:\Program Files (x86)\neevia.com\docConverterPro\configs for a 64-bit (x64) operating system or C:\Program Files\neevia.com\docConverterPro\configs for a 32-bit (x86) operating system.
After completing the new installation, you can then copy the previous configs folder into the new Document Converter Pro file structure to restore configuration settings.
If you are upgrading to a newer Document Converter Pro version, you need to uninstall the current version using the Windows Uninstall or change a program utility before installing the newer version.
Neevia Document Converter Pro 6.7
Important: A Document Converter Pro serial number is tied to a specific version of the application. If you're reusing a serial number, you may need an earlier Document Converter Pro version , which you can download from the Client Resource Center. If you're not sure which version you need, contact Client Support at 888-359-8123 (toll-free in the U.S. and Canada) or 208-359-8123.
Important: If you are reinstalling Document Converter Pro and saved a copy of the configs folder from the previous installation, you can copy the configs folder into the directory structure of the new installation now, replacing the existing folder and its contents, and skip the remainder of this section.

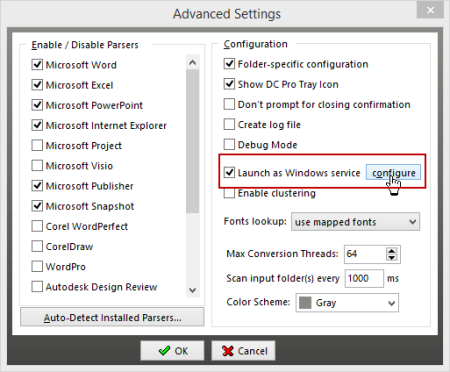
Part of the configuration process is designating a folder in the PolicyTech directory structure where Document Converter Pro will scan for document files it needs to convert and designating another folder where the finished PDF files will be placed. Document Converter Pro also needs to know where you want error logs stored.

[drive]:\[path to installation folder]\Policy Technologies\Policy Manager\data\docs\inpdf\
[drive]:\[path to installation folder]\Policy Technologies\Policy Manager\data\docs\webdocs\
[drive]:\[path to installation folder]\Policy Technologies\Policy Manager\data\docs\errors\

Because the PolicyTech document copies are no longer needed after PDF versions of those documents have been created, leave the Folder for original files box blank.