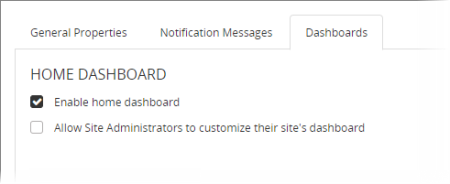
The home (system default) dashboard is available to all users at all sites by clicking Home and can be set up and modified (see Setting Up the System Default Home Dashboard below) only by a global administrator with permissions for all sites.
The home dashboard is enabled by default. To disable it, click to clear the Enable home dashboard check box.
Select Allow Site Administrators to customize their site's dashboard to enable the creation of site-specific home dashboards that override the system-wide dashboard. A site dashboard can be set up or modified by any site administrator (see Setting Up the Home Dashboard for a Site below).
Note: The site-specific dashboard option is only available when Enable home dashboard is selected.
Note: A widget is a compact view you can add to and arrange in a dashboard.
If desired, add saved report widgets.
Note: For security reasons, a saved report widget contains only high-level summary data, and the View Report link is available only to the report creator.
A custom widget is similar to the Company Message widget, in that you can enter a title and body text (one language only), but you can also add a list of the documents assigned to a specific category.
Note: A widget is a compact view you can add to and arrange in a dashboard.
For the site-specific dashboard, you start with a new, blank area with no widgets selected. If you'd like to see the system default dashboard for reference, for Site, select System Default. Switch back to the site dashboard when you're ready to continue.
If desired, add saved report widgets.
Note: For security reasons, a saved report widget contains only high-level summary data, and the View Report link is available only to the report creator.
A custom widget is similar to the Company Message widget, in that you can enter a title and body text (one language only), but you can also add a list of the documents assigned to a specific category.
Some basic widgets will have essentially the same contents for all users (Company Message and Recently Published Documents), while others will show information specific to the currently logged in user (My Tasks, My Favorite Documents, and My Recently Accessed Documents). The structure and content of all basic widgets except Company Message are preset and cannot be modified.
My Tasks: Shows the percentage of the user's assigned tasks for the past year that have been completed.
Company Message: Adds text in the form of a subject and body that you can edit to provide a general announcement or reminder.
Important: If you're a site administrator setting up a site dashboard, you can add the Company Message widget but not edit it. Also, the global administrator may have changed this widget's default header from "Company Message" to something more specific.
To edit the text, in the widget header, click ![]() , click Edit Header or Edit Body, make your changes, and then click Save.
, click Edit Header or Edit Body, make your changes, and then click Save.
|
Notes:
|
My Favorite Documents: Lists the first six documents alphabetically that the user has marked as favorites. The user can click a title to open a document. If the user has more than six favorites, a View All Favorite Documents link is available.
My Recently Accessed Documents: Lists the last six documents and questionnaires the user has opened. The user can click a title to reopen the document/questionnaire.
Recently Published Documents: Lists the last 25 documents/questionnaires that have been approved and published. Users see only those documents/questionnaires they currently have access to by virtue of their assigned roles and permissions and each document's/questionnaire's settings.