Integration Setup: EthicsPoint Case Management
Integrating PolicyTech Policy Management with EthicsPoint Case Management provides the following benefits:
From within EthicsPoint, case investigators can view case-related PolicyTech documents.
From within PolicyTech, a user can do the following:
Note: The following instructions are for setting up integration within PolicyTech. See the EthicsPoint documentation for that application's integration setup instructions.
Setting up integration with EthicsPoint consists of the following tasks, which are described in the sections that follow.
- Defining an issue type category
- Setting integration preferences
- Assigning the case manager permission
- Adjusting browser settings
Defining an Issue Type Category
Part of the integration functionality is syncing EthicsPoint issue types with PolicyTech categories. You need to define a top-level category, such as one called Issue Types, that will hold the issue type categories that will be created with the initial sync and then updated whenever a sync is performed thereafter.
Note: To avoid site mismatches between categories and case managers, we recommend making the category available to all sites and then assigning the case manager permission to users at specific sites.
See Adding a Category for general instructions on how to create a category. Add the top-level category only (no subcategories).
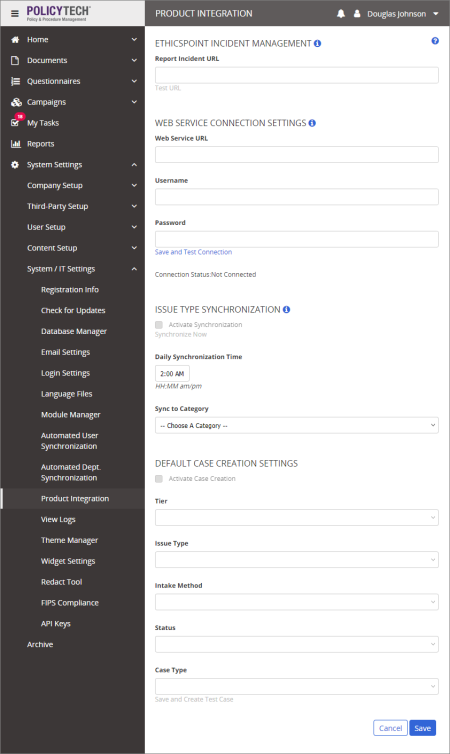
Setting Product Integration Preferences
- Click System Settings, click System / IT Settings, and then click Product Integration.
Important: The Product Integration option is available only after case management integration has been enabled. See Enable an Advanced Feature Add-On for details.
- In the Incident Reporting area, for Report Incident URL type the web address for reporting an incident in EthicsPoint. This is so PolicyTech users can report an incident when reading a policy document that has been assigned an EthicsPoint issue type category.
- In the Web Service Connection Settings area, provide the following information:
- Web Service URL: The URL for the EthicsPoint web service.
- Username and Password: A user name and password for logging in to the server hosting the EthicsPoint web service.
- Click Save and Test Connection. After a few moments, Connection Status should change to Connected. If the connection fails, troubleshoot the connection settings and try again until the connection is made.
- In the Issue Type Synchronization area, provide the following information:
- Daily Synchronization Time: The time each day when you want to sync EthicsPoint issue types with their corresponding PolicyTech categories.
- Sync to Category: Select the category you created to store EthicsPoint issue types.
- Select Activate Synchronization.
- Click Save.
- (Optional) Click Synchronize Now to create the issue type subcategories.
- (Optional) Default Case Creation Settings apply only when a document owner enables the selecting of an answer to a questionnaire question to create a case. Do the following to enable and set up this feature:
- Select Activate Case Creation.
- Make selections for Tier, Issues Type, Intake Method, Status, and Case Type.
Note: The settings you choose here appear as the default settings for the questionnaire creator, who can change these options.
- Click Save and Create Test Case.
- When you're alerted that the test case has been sent, click OK. You can then sign into EthicsPoint to verify that the test case was created.
- Click Activate Case Creation.
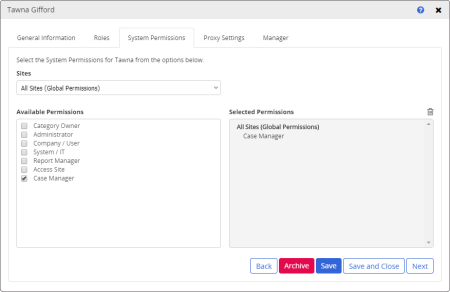
Assigning the Case Manager Permission
The case manager permission enables a user to request that a document be updated. To assign one or more users as case managers, do the following:
- Create or open the user profile (see Adding a User Manually or Editing a User for general instructions).
- Click the System Permissions tab.
- In the Sites list, click All Sites (Global Permissions) or an individual site.
- In the Available Permissions box, select Case Manager.
- Click Save and Close.
Adjusting Browser Settings
For each PolicyTech user, add the following websites to the trusted sites for that user's browser:
*.navexglobal.com
*.ethicspoint.com
|
Notes:
- The method for adding trusted sites varies depending on the browser and browser version being used.
- If WordModulePlus is being used to edit Word and Excel documents, the PolicyTech website (*.policytech.com) should already be a trusted site.
|