Bulk Edit
You can use Bulk Edit to assign document properties to multiple documents at one time.This is especially useful for assigning properties to imported documents that are created as draft documents.
The steps under "Using Bulk Edit" below provide general instruction. See the following topics for additional details:
Next Review Dates after Setting as Approved
Reapplying a Template to Multiple Documents
Using Bulk Edit
Using Bulk Edit consists of two major steps—choosing the documents you want to edit and then modifying the properties of those documents.
- Click PREFERENCES.
- Click Document Setup, and then click Bulk Edit.
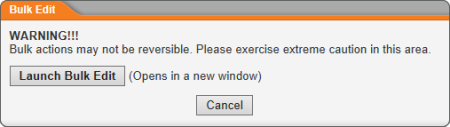
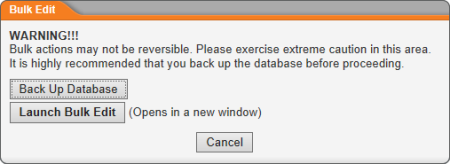
You should now see one of the following warnings, depending on whether your PolicyTech system is hosted by NAVEX Global (first warning) or installed on your organization's premises (second warning).
- (Conditional) If you're prompted to back up your database, we highly recommend that you back up the PolicyTech database before you use Bulk Edit. Click Back Up Database, and then click OK. When the backup is completed, click Close.
- Click Launch Bulk Edit. The Bulk Editor opens in a separate browser window.
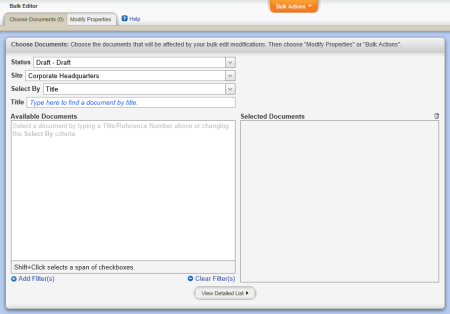
- In the Status list, click the status containing the documents you want to edit.
Note: If you change the selected status after selecting documents, the document selections will be cleared.
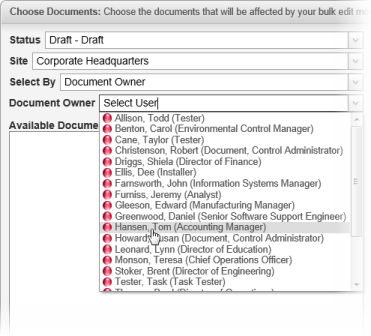
- In the Site box, click a site.
- In the Select By box, click a way to find documents.
- The next box changes depending on what you choose in the Select By list. Do one of the following:
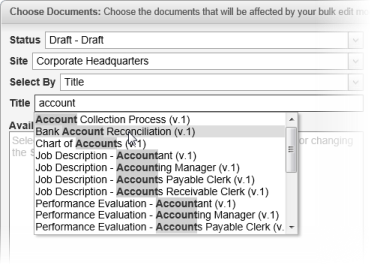
- If you selected Title or Reference #, start typing any part of the title or reference number you want to find. A list appears of document titles or reference numbers containing the characters you typed. Click a document title to add that document to the Selected Documents box.
Note: With Title and Reference #, you are limited to selecting one document at a time.
- If you clicked anything else in the Select By list, in the list below Select By click an item. For example, if you clicked Document Owners, in the Select User list, click a document owner's name.
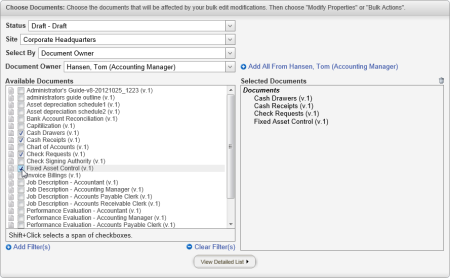
A list of documents corresponding with the Select By item you chose is displayed. Select the check boxes for the documents you want added to the Selected Documents box.
- (Optional) To view more information about the documents you've selected, click View Detailed List. You can then click Show/Hide Columns to add and remove columns, and you can click a column header to sort the list by that item of information.
- With all of the documents selected that you want to edit in the same way, do one of the following:
- Click the Modify Properties tab.
- If the document details list is currently displayed, click the Modify Properties button or tab.
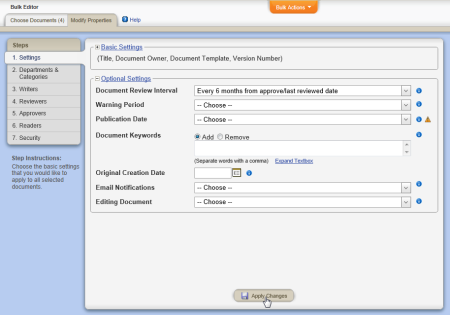
- A modified version of the Properties Wizard appears, which is nearly the same as the one that document owners use while creating documents. You can make changes in any number of the steps, but you must apply the changes in one step before moving on to another. For details on the settings and assignments in the steps, see Assigning Document Properties.
To modify the selected documents' properties, do any of the following:
- If you are working with step 1. Settings or 7. Security, make the needed changes, and then click Apply Changes. For example, a Document Review Interval setting has been selected in the Bulk Editor shown below.
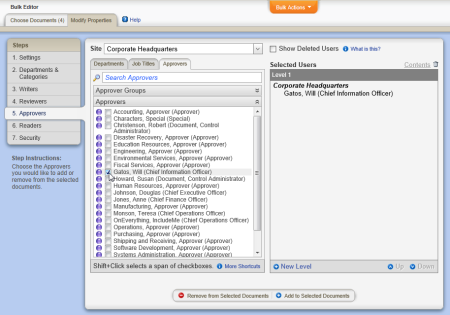
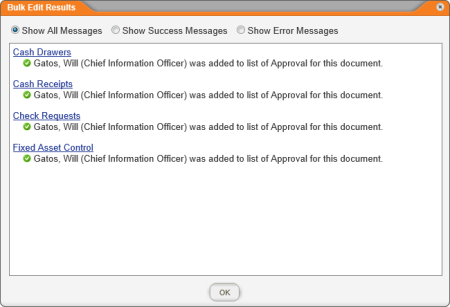
- If you are working with any other step, make the needed changes, and then click Remove from Selected Documents or Add to Selected Documents. For example, in the Bulk Editor shown below, the document control administrator (DCA) has selected documents for which Douglas Johnson is the approver, and the DCA wants to change the approver to Will Gatos. This will be a two-step process. First, the DCA selects Gatos, Will (Chief Information Officer) and then clicks Add to Selected Documents. Second, the DCA selects Johnson, Douglas (Chief Executive Officer) and then clicks Remove from Selected Documents.
Note: Because all approved documents must have at least one assigned approver, the DCA must add the new approver before removing the old one. Removing the one existing approver first would result in an error and the documents would not be updated. The same is true for department assignments.
- Each time you perform a Bulk Editor action, a results window like the one below is displayed. You can click a document title to open and check your changes. Click OK to close the Bulk Edit Results window.
Note: All message types are shown by default. You can also choose to see only success or error messages.
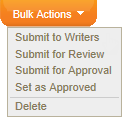
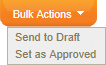
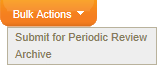
- There are several other bulk editing actions that are not accessible from the properties steps. Click Bulk Actions.
The options you see depend on the status of the selected documents, as shown below. See Bulk Actions for details on each option.
 Screenshot...
With documents in draft or collaboration selected:
With documents in review selected:

With documents in approval selected:
With pending documents selected:

With approved documents selected:
- When you're finished, close the Bulk Editor window.