Editing System-Wide Settings
You can configure general system-wide setting for a company in your Policy & Procedure Management environment. These settings determine the business name used in the application and how filing items (such as departments and categories) and content items (documents, assessments, and campaigns) display in the content list when browsing.
Edit System-Wide Settings
-
Click Settings & Tools > Company Setup, and then click General Properties.
-
On the System-Wide Settings tab, in the Organization Setup section, do any of the following:
-
For Business Title, type the name of your organization. The business title you enter is used in several locations, including the Properties page of the Overview and in welcome emails. The business title is also available to insert into documents using Insert Properties.
-
For Content Arrangement, select Display all items, regardless of count, to allow all content items to appear in the Arrange by list when browsing for content or select Only display items with associated content, to arrange the browse results by one of many properties, and then select one or more of the display options shown in the table below for the arrangement of items in the content list.
Option Description Display content count next to items By default, this setting shows the return count next to a content item.
Filter the user's content list by their assigned department(s) This setting restricts all users to viewing only the items in their assigned departments when using Browse. By default, users can see unrestricted documents and assessments (with the All Users security level assigned) in all departments.
Filter the user's content list by their assigned language This setting limits the display of items to only those items in the user's preferred language. By default, users see items in all languages. Automatically load the content list on the Browse screen This setting allows a list of all content items matching a user's default browse arrangement to be immediately available. By default, when a user first accesses Browse after logging in, that user's default Browse arrangement is displayed, but no content items are displayed in the grid until the user clicks one of the Arrange by items (such as clicking a department name when arranged by departments).
Restrict users to viewing content within their site(s) This setting enforces site restrictions on content items accessed by URL. When using Browse or Search, a user can only find content assigned to the site or sites that user has been assigned to. However, if a Policy & Procedure Management user shares a document's URL with another user, by default that other user can always access the content item directly by entering the URL in a browser, regardless of his or her site assignments.
-
-
For Search Options, select one or more of the display options shown in the table below.
Option Description Search feature always searches all fields This setting locks targeted search fields for all users. By default, users can select in My Profile which content item properties or content—document title, full text, keywords, or reference number—to target when using Search and Find.
Use Advanced Search by default This setting allows the Advanced Search fields to be initially available for all users when searching for documents. With this option, the search results grid will include the Keywords column. When Use Advanced Search by default is selected Use Full-Text for Basic Search or Use Basic Search Functionality options are not available.
Use Full-Text Index for Basic Search This setting improves the speed of a search however it is important to know that this option ignores punctuation, partial and common words such as "the", "and", "to" when searching. Use Basic Search Functionality This setting can be used if users often search with punctuation, partial or common words such as "the", "and", "to" and do not see results in a full-text search.
-
Click the Rebuild/Enable Full-Text Indexes link, to have the system create a full-text index. A notice appears when the index builds successfully. Once the full-text index is built the Advanced Search option is available for searches.
Note: The search results are displayed differently for Advanced Search than for a basic search. The Advanced Search results grid shows both the document titles and the first instance of text within the document (if any) containing the search text, while the basic search results grid contains only titles.
-
In the Regional Settings section, set the Time Zone, Time Format, Date Format, and Language for the site. When you create a site, it inherits the current regional settings in General Properties, and all site regional settings show (Default).
Note: You can override these settings when you create a site (see Adding a Site for details).
- In the Login Logo section, do the following:
-
For Image Justify, click Center, Left (aligned with the left edge of the login screen), or Right (aligned with the right edge of the login screen).
Important: The size allocated for the login logo is set at 400 pixels wide (the same width as the login screen below it), but the height will adjust automatically. If you upload a graphic that is wider than 400 pixels, the Image Justify option will have no effect. The left edge of the image will be aligned with the left edge of the login dialog box.
-
Click Browse. Find and select an image file, and then click Yes to confirm. To remove the currently selected logo, click
 . To replace it, simply upload another graphic file.
 -
In the Default Content Logo section, click Browse. Find and select an image file, and then click Yes to confirm. To remove the currently selected logo, click
. To replace it, simply upload another graphic file. -
In the Default Display Options section, select a Default View from the available options.
Note: Users can override the Default View setting at the general or site level using the options in My Profile. See Working with My Profile Settings.
-
In the Search/Browse Options section, do any of the following:
-
For Default Relationship View, select a view from the available list that applies to all users and not just those with specific role assignments.
Note: If a user is not assigned the role corresponding with the default relationship view, My Relationship will default to All Content - Selected Status for that user. For example, if you select Content I Approve as the default, the default My Relationship setting for a user with only the Assignee role will be All Content - Selected Status.
-
For Default Search/Find Field, select the default for the search and find field, and then click OK. Available options include All Search Fields, Title, Full Text, Keywords, or Reference #. To select more than one option, click Allow multiple selections.
Note: If the Search feature always searches all fields option is also selected, that option overrides the Default Search/Find Field selected here.
Note: The Full Text option applies only to Search and Find in the Documents area. If you select Full Text, then Search and Find in the Assessments and Campaigns areas will default to Title.
-
For Default Results for Advanced Search, select the default number of results listed in the grid for an advanced search.
-
For Default Browse Arrangement, select a setting that corresponds to the Arrange by options in a Browse content list when a user first accesses Browse after login.
Note: You can override these settings when you create a site (see Adding a Site for details).
-
For Default Content Grid Display, click Edit Columns, select the column names you want to include in the grid results view when browsing or searching, and then click Save. (Optional) Click
 and drag the columns up or down to arrange the order, and click Enable/Disable Columns to select or clear the column names you want to display in the list.
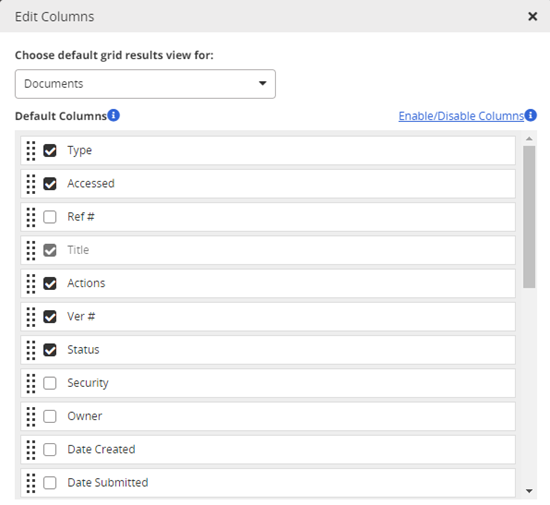
-
Select Show column filters in Browse and Search by default, to show the column filters.
-
Users' Search and Browse grid filter settings are stored locally and override system defaults. If you change the default setting for filter display, click Clear users' current grid filter settings to have all users see the new default filter setting next time they access Search or Browse.
-
For Default Site Selection for Search/Browse, clear the Use User's Default Login Site check box if you want to select a default site or multiple sites that users will see in addition to their default login site when viewing Search or Browse.
Note: Users only see the site(s) that match their permissions.
-
-
In the Global User Settings section, select the check box to enable the Username column in the Show/Hide Columns options under User Setup > User Manager.

Note: Any user with access to the User Manager can see users' usernames. The Username is also available in the user profile.
-
Click Save.
This publication was written and produced at NAVEX Global, Inc., Lake Oswego, Oregon. This publication or any portion thereof is confidential and/or proprietary and may not be reproduced or used in any manner whatsoever without the express written permission of NAVEX Global, Inc.
Copyright © 2026 NAVEX Global, Inc. NAVEX Global® is a registered trademark/service mark of NAVEX Global, Inc. The NAVEX Global® logo is a trademark/service mark of NAVEX Global, Inc. Unauthorized use of NAVEX Global, Inc.’s trademarks/service marks is strictly prohibited without prior written permission from NAVEX Global, Inc.