Designating Assignees for an Assessment
Assignees are those users you require to complete an assessment.
Designate Assignees for an Assessment
-
From an open assessment, click the Properties Wizard tab, and then click Assignees.
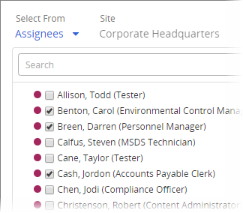
- In the Assignees step, first check to see if the template included assignees. In the example below, the template automatically added two assignee groups. Any assignees added by the template are optional and can be treated as suggestions. To remove an optional assignee, group, department, or job title, click it, and then click
 .
. - For Select From, designate assignees by individual user, by group, by department, or by job titles.
 Select Assignees
- Do one of the following:
- If Assignees or Groups are listed, select one or more of the listed items.
- If Departments, Department Groups, or Job Titles are listed, click one, select one or more users, and then click OK.

Important: As you use any of the user selection methods above, the total number of currently selected individual users is displayed above the selections in the pane on the right, as shown below.
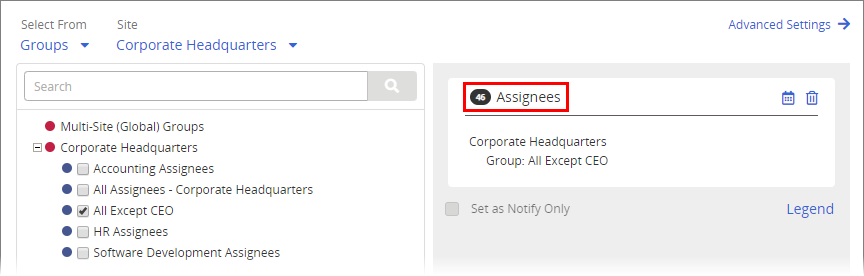
Click the user count to view a list of the selected users.

While viewing currently selected users, do either of the following:
- Use Search to find a specific user in a large list.
- Click Export to Excel and follow the prompts to export an Excel file containing the names and other identifying information of all selected users.
- If Assignees or Groups are listed, select one or more of the listed items.
- Do one of the following:
- For Sites, do one of the following:
- Leave the default site selection to select assignees from the current site.
- Select a different site, and then click OK.
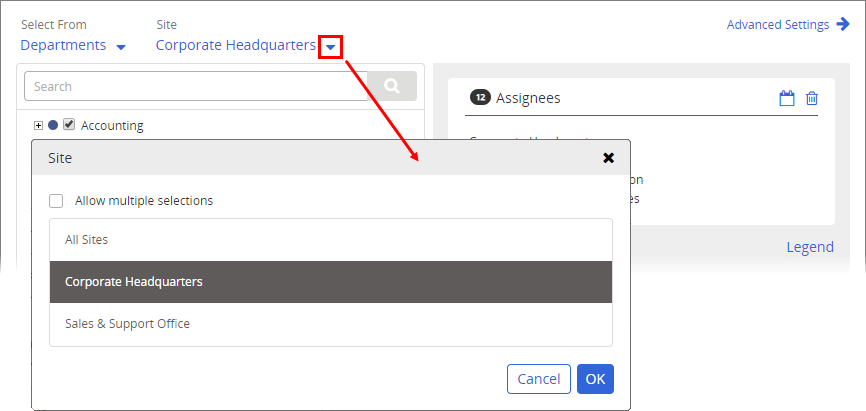
- Under Site, click
 , select Allow multiple selections, select two or more sites, and then click OK.
Important: If you will be designating assignees from other sites, see About Task Assignments and Site Access before doing so.
- (Optional) Set a due date for when assignees should be finished. See Setting Due Dates for
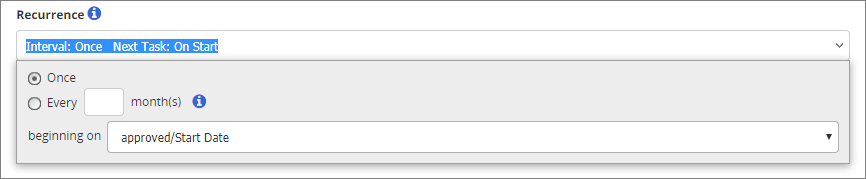
- (Optional) Click Advanced Settings, and then, for Recurrence, click Once or Every. If you clicked Every, then type a number of months, and then, for beginning on, click approved/start date, or click specified date, and then select a date.
- (Optional) Click Advanced Settings, and then click Add Note to include instructions or other information for the assignees. See Adding Notes for Approvers and Assignees for details.
- Do one of the following:
- To continue with assigning properties, click Next Step.
- Click More, and then click Save and Close.
This publication was written and produced at NAVEX Global, Inc., Lake Oswego, Oregon. This publication or any portion thereof is confidential and/or proprietary and may not be reproduced or used in any manner whatsoever without the express written permission of NAVEX Global, Inc.
Copyright © 2026 NAVEX Global, Inc. NAVEX Global® is a registered trademark/service mark of NAVEX Global, Inc. The NAVEX Global® logo is a trademark/service mark of NAVEX Global, Inc. Unauthorized use of NAVEX Global, Inc.’s trademarks/service marks is strictly prohibited without prior written permission from NAVEX Global, Inc.