If your organization uses Microsoft® Active Directory® to manage network user accounts, you can configure PolicyTech to use Active Directory (AD) for the following purposes:
Note: The alternatives to using AD to create and maintain the PolicyTech user list are to define and maintain users manually or to export a user list from another database and import that list into PolicyTech. For details, see User Setup.
There are many factors to consider when deciding how to configure PolicyTech to connect to and use AD. Some of the more common considerations include the following:
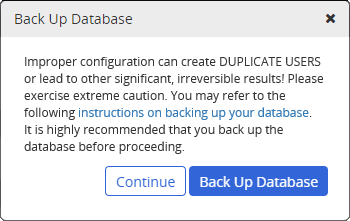
Important: If users have already been defined in PolicyTech, please contact Customer Support at 888-359-8123 (toll-free in the U.S. and Canada) or 208-359-8123 so that a technician can walk you through the PolicyTech/Active Directory sync setup. This will help you avoid many possible issues that could result from syncing existing PolicyTech users with AD users. In addition, we highly recommend first configuring the AD sync on a test site with a restored backup of the production PolicyTech site, and then configuring the production site once you're sure the AD sync on the test site is working correctly.
If, after reviewing the considerations above and the steps below, you have any questions, please contact Client Support at 888-359-8123 (toll-free in the U.S. and Canada) or 208-359-8123.
Knowing how the AD sync works can help you make decisions about how to set it up and when to run it. The following process is performed for each user profile that PolicyTech pulls from each AD domain you specify.
Note: Adding a GUID to a PolicyTech user profile can only be done by the AD sync feature. The GUID property is not available in the PolicyTech user profile in User Manager.
Note: Because these are the minimum required properties (except Domain) for creating a PolicyTech user, these properties are used regardless of whether or not they are enabled and mapped in the domain information you will later add in PolicyTech Login Settings.
|
PolicyTech User Property Added |
From AD User Property |
|---|---|
|
First Name |
First name |
|
Last Name |
Last name |
|
Username |
User logon name (sAMAccountName) |
|
Password |
Random placeholder* |
|
Unique Employee ID |
AD GUID |
|
Site |
Mapped property in PolicyTech Login Settings† |
|
Department |
Mapped property in PolicyTech Login Settings† |
|
Domain |
Domain specified in PolicyTech Login Settings in the Organization Unit (OU) definition that included this user in the sync |
*When AD sync is enabled, PolicyTech ignores whatever is stored in the Password field of the PolicyTech user profile and uses the password from the AD user profile instead. However, because the Password field is required, the sync places a random string in that field when creating a new user.
†When you later specify the AD domains to sync with PolicyTech, you will be required to specify a default site for adding new users and will have the opportunity to map AD user properties to PolicyTech user properties. If you choose not to enable and map the site and department properties, users added during a sync will be assigned to the specified default site and to a department called Unassigned Department.
Important: As you can see from the process description above, the PolicyTech/AD sync feature will create new users, job titles, departments, and sites if they don't already exist in PolicyTech. If you add or modify any of these objects manually in PolicyTech, make sure the site reference IDs, department reference IDs, job title names, or user names exactly match the names of the corresponding objects in AD. If the PolicyTech object name varies even by a single character, such AVDept vs. AVDep, a new, duplicate object will be created in PolicyTech when AD is synced.
Important: If you're not familiar with the AD setup in your organization, be sure to consult with or have your IT specialist or network administrator present when you perform the following steps.
PolicyTech uses the information you enter in the Domain Information form to communicate with AD and perform the user sync. This information is divided into three sections: Connection Settings, Synchronization Mapping, and Remote Domain.
You'll see one of the following messages, depending on whether your PolicyTech system is hosted by NAVEX Global (first message) or installed on your organization's premises (second message).
Note: The domain name you type is only for identifying this domain definition in the PolicyTech Domains list. The actual distinguished domain name will be specified later when you add organizational units.
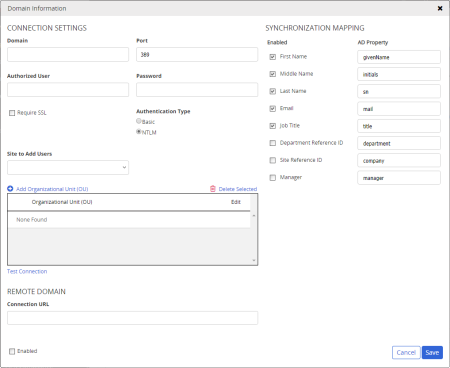
Important: The authorized user should not be required to periodically change the account password, because the AD syncing capability in PolicyTech would be disabled as soon as the password expired. Someone would then need to change the AD password and update the authorized user password in PolicyTech.
|
Important:
|
Note: NTLM is the native Microsoft® authentication protocol and encrypts the user name and password as it is being sent. Basic authentication does not encrypt the user name and password and should be selected only if you have a specific need for doing so.
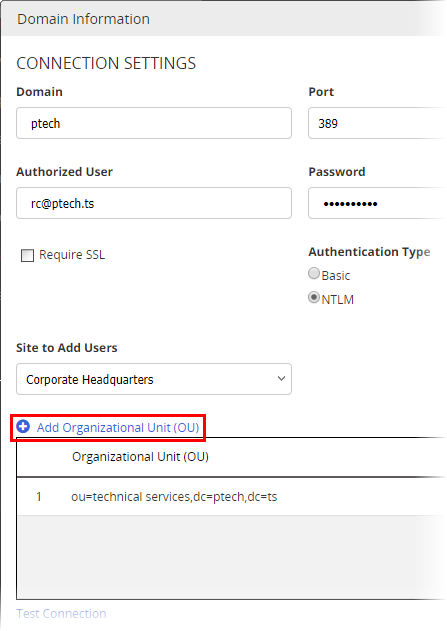
Click Add Organizational Unit (OU).
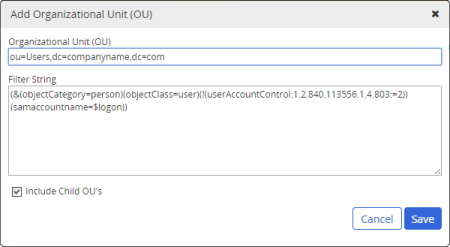
Important: The Include Child OU's option will NOT include sibling (parallel) or parent OUs.
Note: This tests all connection settings, including the user name and password you typed and the new OU definition.
|
Important:
|
An LDAP distinguished name (DN) consists of a string of relative distinguished names (RDNs) separated by commas. In turn, an RDN consists of an attribute name followed by an equal sign and an object name. Which attribute precedes each object name depends on the object type: CN stands for common name; OU stands for organizational unit name; and DC stands for domain component (a domain name usually contains multiple components separated by periods, such as Sales.South.com).

The order of the RDNs within the DN is from the lowest level object name (CN=Users in the example above) to the domain root (DC=MyCompany,DC=com in the example above). Both OUs and containers—which are designated with the CN attribute—can contain users, so you need to make sure you use the correct attribute in each RDN. In an AD tree, objects with a plain folder icon ( in Windows Server 2012 or 2008;
  in Windows Server 2003) are containers and must use CN, while objects with a folder that has a user profile icon (
 in 2008 and 2012) or book icon (
 in 2003) superimposed are organizational units and must use the OU attribute.
For example, let's say that you want to add the Users OU selected in the AD tree shown below.
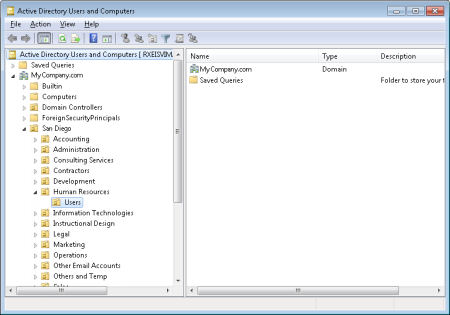
You would type the following DN:
OU=Users,OU=Human Resources,OU=San Diego,DC=MyCompany,DC=com
If you want to include all users in the San Diego OU, you would type the following and make sure that Include Child OU's were selected:
OU=San Diego,DC=MyCompany,DC=com
Important: Providing a complete explanation of LDAP filters is not within the scope of this guide. The information below shows how to use some common methods for filtering by group.
The default filter when you add an OU is as follows:
(&(objectCategory=person)(objectClass=user)(!(userAccountControl:1.2.840.113556.1.4.803:=2))(sAMAccountName=$logon))
The ampersand (&) is an AND operator that returns only those results that match all of the filters that follow it. The exclamation point (!) is a NOT operator that filters for the opposite of the filter following it. In plain English, the complete filter string above says to filter for AD objects that meet all of the following conditions:
Note: The last filter (sAMAccountName=$logon) is a specialized filter required by the PolicyTech application, and $logon is a PolicyTech code variable.
Now, suppose you wanted to include all users who were members of the Researchers group, which belonged to the Users OU in the MyCompany.com domain. You would add the following to the end of the filter immediately inside the outermost right parenthesis:
(memberOf=CN=Researchers,OU=Users,DC=MyCompany,DC=com)
So, the complete filter string would look like the following:
(&(objectCategory=person)(objectClass=user)(!(userAccountControl:1.2.840.113556.1.4.803:=2))(sAMAccountName=$logon)(memberOf=CN=Researchers,OU=Users,DC=MyCompany,DC=com))
To specify more than one group in the same filter, use the pipe symbol ( |, which is the OR operator) and enclose each memberOf filter in parentheses, as shown in the filter string below:
(&(objectCategory=person)(objectClass=user)(!(userAccountControl:1.2.840.113556.1.4.803:=2))(sAMAccountName=$logon)(|(memberOf=CN=Researchers,OU=Users,DC=MyCompany,DC=com)(memberOf=CN=Delevelopers,OU=Users,DC=MyCompany,DC=com)))
|
Additional filter notes:
|
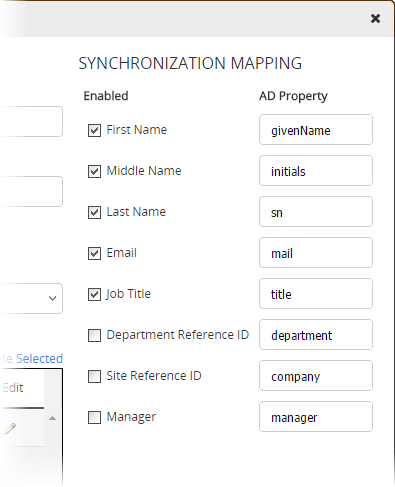
In the Synchronization Mapping area of the Domain Information window, you can tell PolicyTech what information you want pulled from this domain's user profiles into PolicyTech user profiles. PolicyTech will import the user profiles initially and then keep the user properties you specify in sync with their corresponding AD properties.
|
Important:
|
In the Synchronization Mapping area of the Domain Information window, PolicyTech user properties are listed in the Enabled column and AD user properties in the AD Property column.
If your PolicyTech system is hosted by NAVEX Global or your Active Directory service is on a different network than the PolicyTech server, you will need to provide a URL to a web page that can pass the information between PolicyTech and Active Directory. For hosted systems, this URL is filled in by an implementation specialist during installation.
If necessary, type a URL in the Remote Domain area.
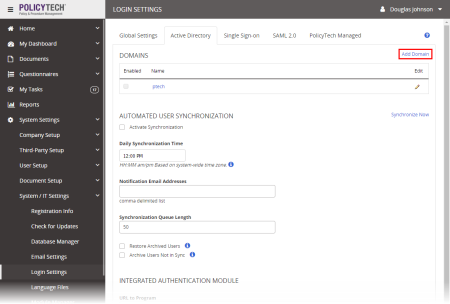
If you want the PolicyTech user database to automatically be synced with Active Directory users, see Automated User Synchronization.
Important: The Integrated Authentication Module settings apply only if PolicyTech is installed on your organization's premises. If PolicyTech is hosted by NAVEX Global, contact Customer Support at 888-359-8123 (toll-free in the U.S. and Canada) or 208-359-8123 for help in setting up Single Sign-On or using SAML for user authentication.
You can have Active Directory users automatically authenticated for using PolicyTech as soon as they log on to the network. This means that they can open PolicyTech without being required to enter a user name or password. This capability is built into and installed with PolicyTech—you need only provide the correct URLs to activate it.
URL to Program. Type the URL, including the including the scheme (http:// or https://), used to access your installation of the PolicyTech program. The program URL is typically in the format http://[company name].policytech.com.
Authentication URL. Type the same URL you typed for URL to Program and append /ADAuth/, as in the following example: http://mycompany.policytech.com/ADAuth/
Note: If AD users click LOG OUT in PolicyTech or if their PolicyTech session times out, they will be presented with the login screen. At that point, they can either simply refresh the web page or type their AD credentials, select the correct domain, and then press Enter.
When you're finished setting up AD sync, and whenever you make changes to the settings in the future, be sure to click Save.