You can quickly define users in PolicyTech by exporting their information from another database, such as a network directory or human resources database, and then importing that information into the PolicyTech database. The import process consists of the following:
Note: To automate this process to run at specific time intervals, see Automated User Synchronization.
Each user import record can contain the user information fields described in the two tables below.
|
Field |
Maximum Characters |
Accepted Characters |
Notes |
|---|---|---|---|
|
Unique Employee ID |
128 |
All except <, |, and ^ |
If PolicyTech is set up to use Active Directory authentication in Login Settings (see Active Directory Settings), we recommend that the unique employee ID be the same as the user's domain login ID. |
|
First Name |
128 |
All except <, |, and ^ |
|
|
Last Name |
128 |
All except <, |, and ^ |
|
|
Site |
255 |
All except <, |, and ^ |
|
|
Department |
255 |
All except <, |, and ^ |
If you need to assign a user to more than one department, see Importing a User with Multiple Departments and Job Titles below. |
|
Field |
Maximum Characters |
Accepted Characters |
Notes |
|---|---|---|---|
|
Middle Name |
128 |
All except <, |, and ^ |
|
|
Job Title |
255 |
All except <, |, and ^ |
If you need to assign a user to more than one job title, see Importing a User with Multiple Departments and Job Titles below. |
|
Email Address |
128 |
Valid SMTP email address characters |
While the Email Address field is not required, we strongly suggest including email addresses so users can receive notifications via email for tasks they need to perform. If there is no email address for a user, the user must remember to periodically check the task list in PolicyTech. |
|
Username |
128 |
All except < |
Must be unique among all PolicyTech users. |
|
Password |
128 |
All except < |
Not applicable (do not include) if PolicyTech is set up to use Active Directory authentication. |
|
Active |
1 |
0 (inactive) or 1 (active) |
Facilitates deactivating (archiving) previously imported users only during a user sync. A user marked inactive (0) will be moved to the Archive. If a previously imported user is currently in the Archive, a 1 value restores that user to active status.* |
|
Language |
6 |
Any valid language code |
See Language Code Tables. |
|
Domain |
240 |
Valid Active Directory® domain name characters |
|
|
Manager |
128 |
All except <, |, and ^ |
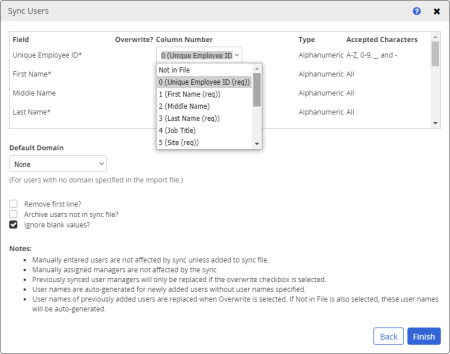
Must be the unique employee ID of a person assigned as this user's manager in PolicyTech (see Assigning a Manager). Note: You can assign only one manager to a user in an import file. You must use User Manager to assign additional managers. |
*In the rare case where you need to archive all users in the site, you cannot archive them all at once during a sync. You must leave at least one user active and then manually archive that user after the sync (see Archiving a User.)
You can assign a user to more than one department and job title by separating multiple sites, departments, and job titles with the vertical bar (|) character. (Spaces before and after the vertical bar character are ignored.) The Site, Department, and Job Title fields must always have the same number of items in them, even if one or more are empty. For example, if you include two departments, there must also be two sites and two job titles designated, as shown below. Notice that including a job title is optional, but the Job Title field must include the same number of vertical bars as the Site and Department fields.
If custom user attributes have been created (see Custom Attributes), you can import values for those custom attributes. Simply export or manually add columns of custom attribute values to the import file. You can then map the custom attribute columns as part of the import (sync) process.
Note: If any custom attributes are dates in any format except File Date, be aware that leading zeroes for single digit days and months are required. If you save an Excel file containing custom attribute dates and those columns are formatted with a standard Excel date format, leading zeroes will be stripped from the dates when saving to tab-delimited file format, which will cause the date values not to be imported. One solution is to create a custom Excel date format, such as mm/dd/yyyy, for custom attribute date columns before saving as a tab-delimited file.
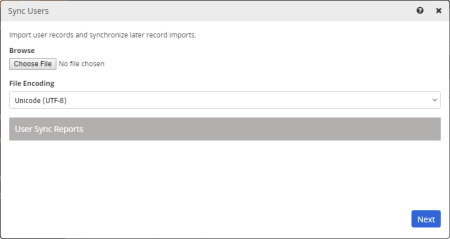
From within the user database application, export user information into a tab-delimited text (.txt) file. This is called the user sync file in PolicyTech. Each record in the user sync file must contain at least the required user information fields. We recommend you export a header row containing field (column) names to help with mapping those fields when you import the user information into PolicyTech.
Note: Exporting the fields in the order they are listed in the table in the "User Information Fields" section above will make mapping these fields to PolicyTech user information fields easier. To download a sample user sync file with fields in the proper order, click the following link: Blank User Import Excel Worksheet.
Please consider the following before performing a user sync:
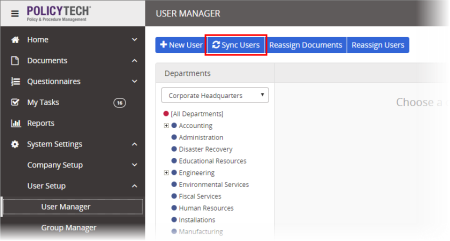
To perform an initial import of user information, or to sync user information after the initial import,
Note: Fields marked with an asterisk (*) are required.
|
Note:
|
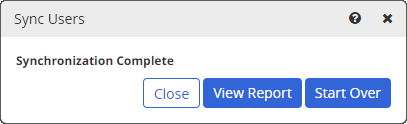
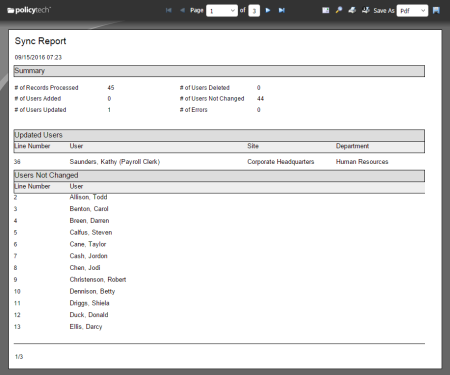
The report opens in a separate window, where you can print or save it.
Note: Each report is automatically saved in the PolicyTech database. To view a sync report from a previous user sync, click Sync Users, find the report in the User Sync Reports box, and then click View. You can also click XML and follow the prompts to download the report as an XML file.