Automated User Sync for an On-Site PolicyTech Installation
- Click System Settings, click System /IT Settings, and then click Automated User Synchronization.
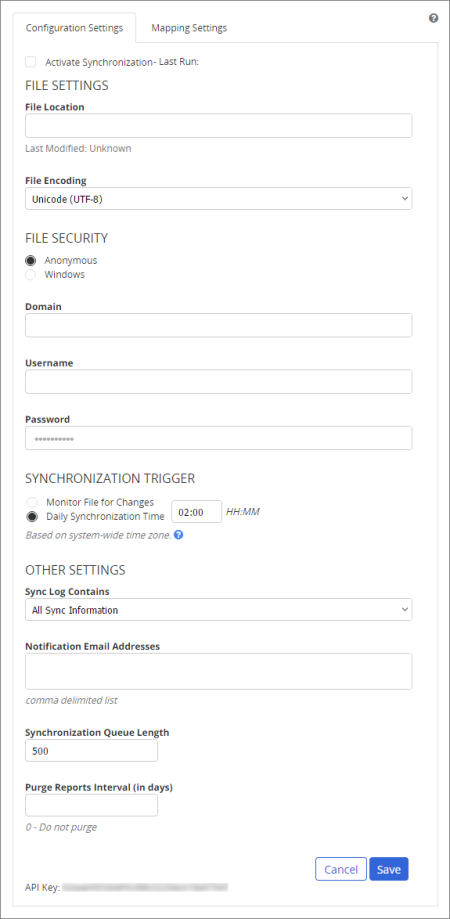
- In the File Settings area, you designate the name and location of the tab-delimited user import file that you will periodically update. (See Importing and Syncing Users from Another Database for details on the file and data formats and on syncing behavior.) Do one of the following:
- Type a file name to use the following default location in the PolicyTech directory structure:
[drive]:\[path to installation directory]\Policy Technologies\Policy Manager\data\user import
Note: The default installation folder is C:\Program Files\ for a 32-bit (x86) server operating system or \C:\Program Files (x86)\ for a 64-bit (x64) server operating system.
- Include a network path before the file name to designate a different location.
- (Optional) The default file encoding setting is Unicode (UTF-8), which works in most cases. If you know you need to use a different character encoding system, in the File Encoding list, click the appropriate option.
- If your Windows® network security is such that PolicyTech will need a user name and password to access the export file, in the File Security area click Windows, and then fill in the Domain, Username, and Password information. Otherwise, leave Anonymous selected.
- In the Synchronization Trigger area, select how PolicyTech will know when to upload and sync the import file with the user database.
- In the Other Settings area, do any of the following:
- For Sync Log Contains, click All Sync Information, ONLY Changes, ONLY Errors, or Errors and Changes.
- Type one or more email addresses separated by commas if you want a notification email sent to specific users whenever an error occurs during the import and sync process.
- To maintain server performance, you can indicate a queue length (default of 500) to import users in batches.
- Indicate in number of days how often you want sync reports purged (deleted).
Note: Designating a purge interval is required. If you don't want the sync reports deleted, type 0 (the number zero) in the Purge Reports Interval box.
- Click Save, and then click the Mapping Settings tab.
Important: All of the following must be true before you can access the Mapping Settings page.
- There must be a correct file path, including the import file name, entered in the File Location box.
- An import file with a matching name must exist in the designated file location.
- If network security requires credentials to access the folder containing the document, you must have provided the appropriate Windows domain, user name, and password.
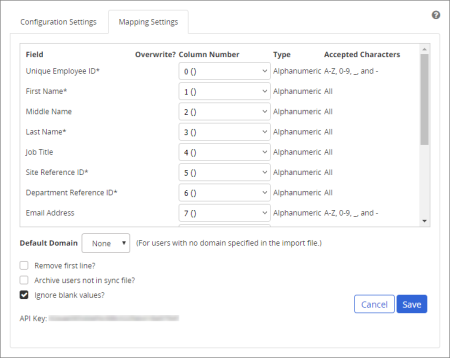
- In the upper box, map each PolicyTech user field to its corresponding field in the user information file. If the field is optional and no corresponding field exists in the file, or if the field does exist but you don't want the information in that field imported, select Not in File.
Note: Fields marked with an asterisk (*) are required.
- (Optional) Notice the check boxes in the Overwrite? column after Username, Password, and Manager. When performing a sync (importing anytime after the initial import), user name, password , and manager information from the tab-delimited file that is different than the corresponding information in PolicyTech does not overwrite the information in PolicyTech unless you select the Overwrite? check boxes.
- (Optional) If you're using Microsoft® Active Directory® and have defined domains in PolicyTech (see Active Directory Settings), use Default Domain to specify which domain a user should be assigned to by default if the user's record in the import file does not include a domain.
- (Optional) If the first row of your import file contains column names, select Remove first line? to prevent creating a user from column names.
- (Optional) If the import file contains all of the users you want included in PolicyTech, you can select Archive users not in sync file? to clean out any unneeded user records.
Note: PolicyTech is intentionally designed not to allow all users in a site to be archived at once. In other words, a sync attempt with Archive users not in sync file? selected and with no users listed in the sync file will fail. In the rare case where you need to archive all users in the site, you must leave at least one user in the sync file and then manually archive that user after the sync (see Archiving a User).
- By default, blank values are ignored. If you want blank values for unrequired fields in the import file to delete any existing, corresponding values in the PolicyTech user database, click to clear the Ignore blank values? check box.
- Click Save.
- When you are ready to activate the automated sync, click the Configuration Settings tab, select Activate Synchronization, and then click Save.