Step 5: Approvers
You must assign at least one approver to a document. Before you can assign a user to approve a document, that user must have been assigned the approver role.
Approvers are usually management/executive level users who give their approval to publish the final draft of a document. They are considered an organization's top-level approving authority and have legal responsibility for what they approve. Only individuals with appropriate authorization should be given the approver role.
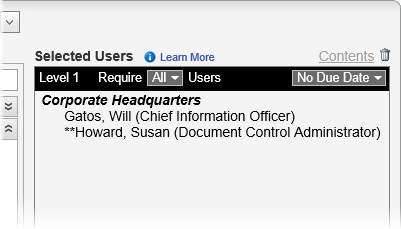
- In step 5. Approvers, check the Selected Users box for any approvers' names the template creator may have added. In the example below, the template has automatically added two approvers. Notice that the second approver's user name is marked with two asterisks (**), which means that this approver is required for documents using the currently selected template. The other approver is optional and can be treated as a suggestion. To remove an optional approver from Selected Users, double-click the approver's name (or select one or more approvers' names, and then click
 ).
).
- To add approvers, in the Site list, click a site containing one or more approvers you want to assign.
Important: If you will be assigning approvers from other sites, see Assignees and Site Access before doing so.
- A list of approvers within the selected site is displayed by default. If you want to use another method for selecting approvers, see Other Ways to Select Approvers. Otherwise, select one or more reviewers.
- (Optional) When you are finished adding approvers from the current site, repeat steps 2 and 3 for any other sites containing approvers you want to assign.
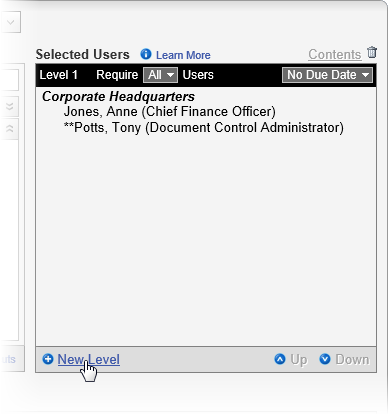
- (Optional) As you assign approvers, they are all assigned to level 1 of the approval stage, meaning that they will all receive a task at the same time when the document goes to approval. If you want the document to go to approvers in a specific order, click New Level to create additional approval levels. You can then specify how many of the assigned approvers within a level must finish their reviews before the document moves on to the next level. You can also specify a due date for each level. See Working with Levels for details.
- (Optional) Set a due date for when all approvers should be finished with the document. For details on the different ways to set a due date, see Setting Due Dates for Writing, Reviewing, Approving, and Reading Tasks in the "Working with Levels" topic. (You can specify a different due date for each level.)
- (Optional) Click Add Note to include instructions or other information for the assigned approvers. See Adding Notes for Writers, Reviewers, and Approvers for details.
Note: If you have assigned multiple approvers to an Excel® document, consider adding a note assigning a different text font color to each approver so you can differentiate among the approvers' changes should they revise the document. (This isn't necessary for Microsoft® Word documents, because the Track Changes feature automatically includes information about who made each change.)
- Do one of the following:
- To continue with assigning properties, click Next Step, and then go to Step 6: Readers in this guide.
- To stop assigning properties and finish later, click Options, and then click Save and Close. (When you are ready to continue with assigning properties, go to Editing a Draft Document.)
- To work on document content, click Edit Document. (When you are ready to continue with assigning properties, if the document is still open click Properties Wizard, or go to Editing a Draft Document if you need to reopen it.)