Importing and Syncing Users from Another Database
Important: These instructions apply only to environments using the standalone Policy & Procedure Management application. For environments with Policy & Procedure Management on NAVEX One, see User Import for further details.
You can quickly define users in Policy & Procedure Management by exporting their information from another database, such as a human resources application, and then importing that information into the Policy & Procedure Management database. The import process consists of the following:
- Exporting user information from another database
- Mapping the user information to the corresponding Policy & Procedure Management user fields (sync file)
- Importing users into Policy & Procedure Management
Step 1: Exporting User Information
From within the external application, such as a human resources database, export user information into a tab-delimited text (.txt) file.
Step 2: Preparing for the User Sync
When preparing the user sync file to map to the corresponding Policy & Procedure Management user fields consider the rules shown below. The column names and the arrangement of the data in the exported text file determine what imports into Policy & Procedure Management. Each record in the user sync file must contain at least the required Policy & Procedure Management user information fields and it may also contain optional user information fields.
User Sync Rules and Behavior
- Any user in the sync file that does not exist in the Policy & Procedure Management database will be added. Policy & Procedure Management compares the unique user ID of each user in the sync file to the user IDs of all users in the Policy & Procedure Management database. If it does not find a match, the user is added. If it does find a match, it overwrites all the other fields for the user with that ID with the corresponding fields from the sync file. However, the Username, Password, and Manager fields will not be overwritten unless specifically designated to be overwritten.
- While the Username and Password fields are not required in the sync file, they are required to create a user record in Policy & Procedure Management. For this reason, if the Username and Password fields are empty in the sync file or if you select Not in File for these fields when mapping sync file fields, Policy & Procedure Management randomly generates a user name and password so the record can be created. Before the newly created user can log in to Policy & Procedure Management, you must manually change that user's username and password and provide that information to the user.
- Any job title, site, or department in the sync file that does not exist in the Policy & Procedure Management database will be added. The spelling of existing job titles, sites, and departments must exactly match the same spelling in the sync file as those in the Policy & Procedure Management database to avoid creating duplicates with variant spellings.
- Users added manually to the Policy & Procedure Management database are not affected by any action performed during a user sync. For example, if you select Archive users not in sync file? when setting up a sync, manually added users will not be archived. If you do want a user sync to affect manually added users, you must add them to the sync file, making sure that the Unique Employee ID fields in the sync file match those in the Policy & Procedure Management database.
- Policy & Procedure Management is intentionally designed not to allow all users in a site to be archived at once. In other words, a sync attempt with Archive users not in sync file? selected and with no users listed in the sync file will fail. In the rare case where you need to archive all users in the site, you must leave at least one user in the sync file and then manually archive that user after the sync.
- Newly added users are assigned only the Assignee role. To assign additional roles and permissions, you must edit each user record individually (see Adding a User) or use the Bulk Permissions Editor to assign roles and permissions to multiple users at once (see Working with Bulk Permissions Editor).
User Sync Fields
The user sync file has Required fields and Optional fields.
|
Field |
Maximum Characters |
Accepted Characters |
Notes |
|---|---|---|---|
|
Unique Employee ID |
128 |
All except <, |, and ^ |
If Policy & Procedure Management is set up to use Active Directory authentication, the unique employee ID should be the same as the user's domain login ID. See Configuring Active Directory Settings for more information. |
|
First Name |
128 |
All except <, |, and ^ |
|
|
Last Name |
128 |
All except <, |, and ^ |
|
|
Site |
255 |
All except < and ^ |
|
|
Department |
255 |
All except < and ^ |
If you need to assign a user to more than one department, see Importing a User with Multiple Departments and Job Titles below. |
|
Field |
Maximum Characters |
Accepted Characters |
Notes |
|---|---|---|---|
|
Middle Name |
128 |
All except <, |, and ^ |
|
|
Job Title |
255 |
All except < and ^ |
If you need to assign a user to more than one job title, see Importing a User with Multiple Departments and Job Titles below. |
|
Email Address |
128 |
Valid SMTP email address characters and format |
While the Email Address field is not required, we strongly suggest including email addresses so users can receive notifications via email for tasks they need to perform. If there is no email address for a user, the user must remember to periodically check My Tasks in Policy & Procedure Management. |
|
Username |
128 |
All except < |
Must be unique among all Policy & Procedure Management users. If Policy & Procedure Management is set up to use Active Directory authentication, the Username value must be the same as the user's domain login ID. See Configuring Active Directory Settings for more information. |
|
Password |
128 |
All except < |
Not applicable (do not include) if Policy & Procedure Management is set up to use Active Directory authentication. |
|
Active |
1 |
0 (inactive) or 1 (active) |
Facilitates deactivating (archiving) previously imported users only during a user sync. A user marked inactive (0) will be moved to the Archive. If a previously imported user is currently in the Archive, a 1 value restores that user to active status. |
|
Language |
6 |
Any valid language code |
For a list of languages, see Language File Basics. |
|
Domain |
240 |
Valid Active Directory domain name characters |
Applies only if Policy & Procedure Management is set up to use Active Directory authentication. |
|
Manager |
128 |
All except <, |, and ^ |
Must be the unique employee ID of a person assigned as this user's manager in Policy & Procedure Management. See Assigning a Manager for more information. Manually assigned managers are not affected by the sync. Note: You can assign only one manager to a user in an import file. You must use User Manager to assign additional managers. |
Importing a User with Multiple Departments and Job Titles
You can assign a user to more than one department and job title by separating multiple sites, departments, and job titles with the vertical bar (|) character. (Spaces before and after the vertical bar character are ignored.) The Site, Department, and Job Title fields must always have the same number of items in them, even if one or more are empty. For example, if you include two departments, there must also be two sites and two job titles designated.
Importing Users with Custom Attributes
If custom user attributes have been created (see Working with Custom Attributes), you can import values for those custom attributes by manually adding columns of custom attribute values to the import file. You can then map the custom attribute columns as part of the user sync process. If a custom attribute allows multiple values to be assigned to a single user, you can include multiple values and separate each from the next with the vertical bar (|) character. (Spaces before and after the vertical bar character are ignored.)
Important: If any custom attributes are dates in any format except File Date, be aware that leading zeroes for single digit days and months are required. If you save an Excel file containing custom attribute dates and those columns are formatted with a standard Excel date format, leading zeroes will be stripped from the dates when saving to tab-delimited file format, which will cause the date values not to be imported. One solution is to create a custom Excel date format, such as mm/dd/yyyy, for custom attribute date columns before saving as a tab-delimited file.
Sample tab-delimited text (.txt) file
This sample user sync file contains all the available user information fields.

Step 3: Sync Users
When the user sync file is ready, the next step is to map to the corresponding Policy & Procedure Management user fields and start the sync process.
- Click Settings & Tools > User Setup, and then click User Manager
- Click Sync Users.
- Click Choose File. Find, and select the exported user information text file, and then click Open.
- If the export file was encoded using something other than Unicode (UTF-8), in the File Encoding list, select that encoding.
- Click Next.
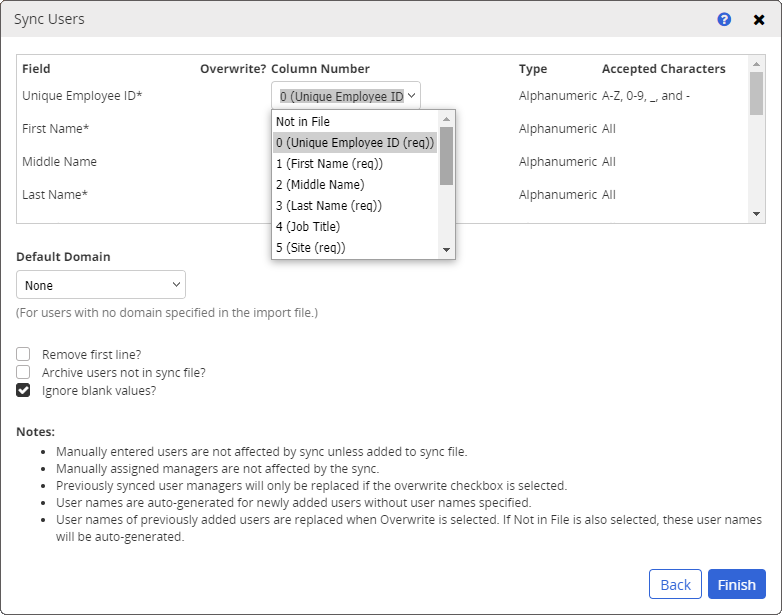
- In the upper box, in the Column Number field, select the user information field that corresponds with the Policy & Procedure Management field. If the field is optional and no corresponding field exists in the file, or if the field does exist but you do not want the information in that field imported, select Not in File.
Note: Required fields are marked with an asterisk (*).
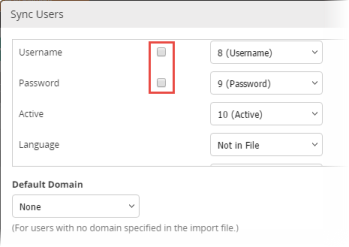
- (Optional) The Username, Password, and Manager fields have an Overwrite? column. When performing a sync (importing any time after the initial import), user name, password , and manager information from the tab-delimited file that is different than the corresponding information in Policy & Procedure Management does not overwrite the information in Policy & Procedure Management unless you select the Overwrite? check boxes.
- If you are using Active Directory authentication for Policy & Procedure Management user login, click the Default Domain box, and then click the domain you want a user assigned to if the user record in the file does not contain a domain field or if the mapped domain field is empty.
- If the user information file contains a header row with column names, select Remove first line? to avoid creating an extraneous user from the header row information.
- If you want any user not found in the user sync file to be archived in Policy & Procedure Management, select Archive users not in sync file?. This option only affects users previously imported into Policy & Procedure Management. Users added manually will not be archived.
Note: Policy & Procedure Management is intentionally designed not to allow all users in a site to be archived at once. In other words, a sync attempt with Archive users not in sync file? selected and with no users listed in the sync file will fail. In the rare case where you need to archive all users in the site, you must leave at least one user in the sync file and then manually archive that user after the sync.
- By default, blank values are ignored. If you want blank values for optional fields in the user sync file to delete any existing, corresponding values in the Policy & Procedure Management user database, click to clear the Ignore blank values? check box.
- Click Finish.
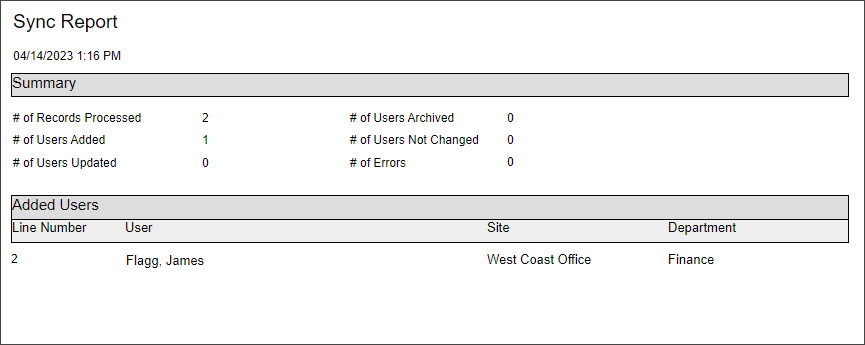
- A progress bar is shown while the sync is processing. If you need to cancel it, click Abort Sync. When the import is complete, click View Report. The report opens in a separate window, where you can print or save it.
Note: Each report is automatically saved in the Policy & Procedure Management database. To view a sync report from a previous user sync, click Sync Users, find the report in the User Sync Reports grid, and then click View. You can also click XML and follow the prompts to download the report as an XML file.
- Click Close.
This publication was written and produced at NAVEX Global, Inc., Lake Oswego, Oregon. This publication or any portion thereof is confidential and/or proprietary and may not be reproduced or used in any manner whatsoever without the express written permission of NAVEX Global, Inc.
Copyright © 2026 NAVEX Global, Inc. NAVEX Global® is a registered trademark/service mark of NAVEX Global, Inc. The NAVEX Global® logo is a trademark/service mark of NAVEX Global, Inc. Unauthorized use of NAVEX Global, Inc.’s trademarks/service marks is strictly prohibited without prior written permission from NAVEX Global, Inc.