Creating an Assessment (Stand-alone)
You create an assessment using a series of Properties Wizard steps, each designed to guide you through the available assessment settings. If you need to add an assessment to a document, see Creating a Document Assessment.
Note: The ability to create stand-alone assessments is an optional feature that may or may not be enabled. If you do not see Assessments in the sidebar menu and you need to create a stand-alone assessment, talk to your Policy & Procedure Management administrator.
Create an Assessment
- Click Assessments, and then click New.
- In the Settings pane, type a title.
- For Assessment Owner, select the person who will be required to oversee the creation and updating of the content.
- If you have been assigned the Assessment Owner role, your user name is automatically selected as the assessment owner. If you choose to reassign the document to another user, select a name from the list in a site that you have permission to view.
- If you are an administrator, select an assessment owner.
-
(Optional) To create a task and add it to the owner's My Tasks list, click Owner Instructions, select Create task for owner, write the task instructions, and then click Close.
- For Template, do one of the following:
- If template options are available, select one. The template list includes all templates from all sites you have access to.
- If you see a template name but no option for selecting a different template, there is only one template available, so it is selected automatically.
Note: You must at least type a title, choose a template, and then click Save or Next Step before you can complete the remaining Properties Wizard steps.
-
(Optional) Click Preview to open the selected template in a separate browser tab or window.
-
(Optional) By default, a new campaign is started as soon as it is approved. For Start Date, select Wait to start until the following date, click
 , and then select a date.
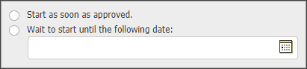
- (Optional) For End Date, specify the date you want all assignee tasks for this assessment to expire. On that date, all incomplete tasks will be canceled, removing them from assignees' My Tasks lists. Also, if any assignee groups, departments, or job titles are selected, new users added to one of these entities after the task end date will not receive tasks.
- Click Save. You should now see all Properties Wizard steps included in the template.
Important: You must save the assessment at this point before you can access Advanced Settings, Assignee Task Settings, and the other Properties Wizard steps.
- (Optional) Click Advanced Settings, and then adjust any of the following options, as needed.
For Assigned Proxy Author, select a name from the list of users who can edit the item and its properties.
For Archive Date, if you know there will be no new versions of this content item created and that it will no longer be relevant in the future, you can specify the date when you want the approved item automatically moved to the Archive.
For Review Interval, do one of the following:
Click No Review Date only if you do not want a reminder and a task sent to the owner.
Click Every [number] months from [selected event or specified date], type a number, and then select a date option. When a review interval is set, the content item will come due for review after the specified interval has passed. The owner receives an email and a Policy & Procedure Management task as the review date approaches. The default review interval setting is whatever the template creator selected.
For Warning Period, do one of the following:
Click Use Default Warning of [n] month(s) before Review Interval.
Click Warn [n] months before Review Interval, and then type a number in the box.
For Keywords, type any words you think users might use to search for this content item. Keywords are especially useful for including relevant words that are not contained in the item's title or a Word document's contents.
For Notification Settings for Owners & Proxies, select the type of email notification for this item.
Note: Your selection could be overridden by an email notification option set by a global administrator.
For Language, select a language for this content item. This setting works in conjunction with the Filter by Language setting in My Profile. Selecting a language for this content item enables users to filter (hide or display) the item based on its language setting.
- Do one of the following:
- To continue with assigning properties, click Next Step, and then go to Setting Assessment Visibility.
- Click Edit Assessment, and then go to Adding Content to an Assessment.
- Click More, and then click Save and Close.
This publication was written and produced at NAVEX Global, Inc., Lake Oswego, Oregon. This publication or any portion thereof is confidential and/or proprietary and may not be reproduced or used in any manner whatsoever without the express written permission of NAVEX Global, Inc.
Copyright © 2026 NAVEX Global, Inc. NAVEX Global® is a registered trademark/service mark of NAVEX Global, Inc. The NAVEX Global® logo is a trademark/service mark of NAVEX Global, Inc. Unauthorized use of NAVEX Global, Inc.’s trademarks/service marks is strictly prohibited without prior written permission from NAVEX Global, Inc.