Adding a User Manually
To add a user manually,
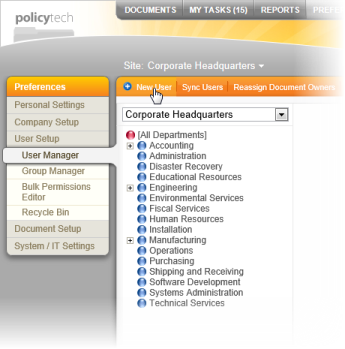
- Click PREFERENCES.
- Click User Setup, and then click User Manager.
- Click New User.
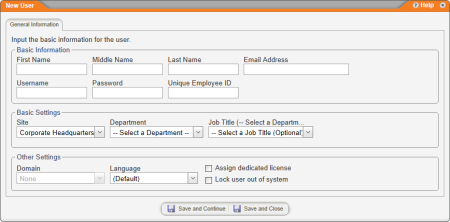
- Under Basic Information, enter the user's identifying information.
Important: If your organization's security policy requires that only users know their own passwords, you can require that new users change their passwords upon first login. See Password Settings (Built-in Accounts Tab) for details.
|
Notes:
- All basic information is required except for Middle Name and Email Address. However, if the user is designated as a document control administrator in step 10 below, then Email Address is also required.
- The Unique Employee ID can be the same as the Username.
|
- Under Basic Settings, assign the user to a site and department.
Important: You can assign a user to more than one department and job title, but not until after you save the user for the first time. See Assigning Additional Departments and Job Titles for details.
You have now entered and selected all the information necessary to add the new user. You can continue with steps 6 through 18, which guide you through the remaining optional settings, or you can skip to step 19 to finish adding the user now. You can always change user settings later.
- (Optional) Assign a job title.
Important: Because many PolicyTech™ tasks can be assigned by job title across multiple departments, we recommend assigning job titles to all users to avoid the inefficiency of having to assign users individually. For details on creating job titles, see Working with Job Titles.
- (Optional) If more than one domain exists, select the primary domain for this user.
- (Optional) Select the language for this user's PolicyTech user interface text.
Note: The languages available depend on which have been added to PolicyTech.
- (Optional) If your organization has purchased dedicated licenses and you want to assign this user a dedicated license (as opposed to the default concurrent user license), select the Assign dedicated license check box.
Note: If the option is inactive (grayed out), then all available dedicated licenses have already been assigned. If you don't see this option, then your organization has not purchased dedicated licenses.
- (Optional) If you need to temporarily prevent this user from logging in for any reason, select the Lock user out of system check box.
- (Optional) Click Save and Continue. The Document Roles, System Permissions, and Proxy Settings tabs appear, with the Document Roles tab displayed.
- (Optional) By default, each new user is assigned the Reader role. To assign other roles to this user, see Assigning Document Roles.
- (Optional) Click Next to go to System Permissions.
- (Optional) To assign system permissions to this user, see Assigning System Permissions.
- (Optional) Click Next to go to Proxy Settings.
- (Optional) To make proxy assignments for this user, see Assigning a Proxy Author.
- (Optional) Click Next to go to the Manager tab.
- (Optional) To assign this user as a manager of a department or of specific users, see Assigning a Manager.
- Click Save and Close.