Creating a Master Document for Localization Workflow
- Ask your document control administrator which templates have Localization Workflow enabled.
- Start a new document (see Creating and Working with Draft Documents for help) or open an existing one.
- (Conditional) If you're creating a new document, in the Properties Wizard with the Settings step selected, type a title.
- Do one of the following:
- If this is a new document, in the Document Template list, click a template that has Localization Workflow enabled.
- If this is an existing document and you see Localization Workflow below Security, move on to the next step.
- If you're editing an existing document and its currently assigned template does not have Localization Workflow enabled, in the Document Template list, click an enabled template. Then, in the Confirm window, select at least the Properties check box, and then click Save.
- Modify other settings and make or change task assignments as needed (see Assigning Document Properties for help).
Important: The writer, reviewer, approver, and reader assignments you make in the master document are not inherited by the localized copies you create. Preset assignments are only inherited from the selected template, which assignments can be changed by a localized copy owner. An exception to this rule is when you select Sync & Auto Assign or Sync & Auto Assign & Use Master's Read Interval as the Master/Copy Mode setting when you create a copy. In this case, localized copies inherit any reader assignments made in the master document.
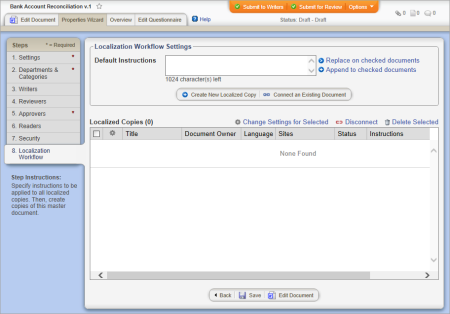
- Click Localization Workflow.
- (Optional) When this master document is approved, the localized copy owners will be notified that they have been assigned to own and work on the copy documents. You have the option of including instructions in these document owner notifications. You can type instructions separately when creating each copy or preset the instructional text so that it is automatically added to each copy you create. You can then modify the default text in each copy as needed.
In the Default Instructions box, type the text you want automatically added to each new copy's settings.
- Use one or both of the following methods to add localized copies:
- Click the Edit Document tab, and then add the document content (see Writing a Document (Windows) or Writing a Document (Mac)).
- (Optional) Add a questionnaire (see Adding a Questionnaire to a Master Document).
- (Optional) Attach files or add reference links (see Attaching Files and Adding Reference Links).
- Submit the document for collaboration, review, or approval (see Submitting a Document to Writers, Reviewers, or Approvers).
Create Localized Copies as New Documents
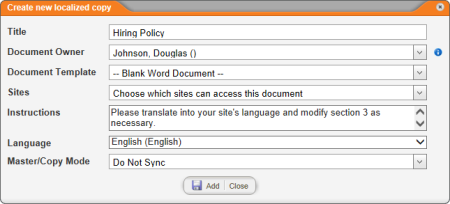
- In the Localization Workflow step of the master document, click Create new localized copy.
By default, the new copy inherits the master document's Title, Document Owner, and Document Template settings, any of which you can change.
|
Notes:
- The copy's assigned owner can change any of the Create New Localized Copy settings except Master/Copy Mode.
- A copy document is assigned to its document owner's department by default.
|
- (Optional) Change the default title inherited from the master document.
Note: The copy's assigned owner can also change the title, such as translating it into the local language.
- (Optional) Unless you intend to own this copy yourself, in the Document Owner list, click the person who will be responsible to localize the copy, submit it for review and approval, and maintain it in the future.
- (Optional) If the copy needs a different template, in the Document Template list, click the appropriate template.
Important: To preserve the master document's contents in the copy, only the new template's properties will be applied to the localized copy. In other words, when the copy's document owner opens the copy, its contents (headers, footers, and body) will be the same as the master document's while the settings in the Properties Wizard will be those from the selected template.
- In the Sites list, select the check boxes for the sites that will have access to this localized copy.
- (Optional) In the Instructions box, type or edit the text you want included in the email sent to notify the document owner to work on this copy.
- (Optional) In the Language list, click the language for this localized copy.
|
Important:
- The Language setting is especially important if you plan to select Sync & Auto Assign or Sync & Auto Assign & Use Master's Read Interval as the Master/Copy Mode for a localized copy in the next step. With one of these settings selected, reader assignments are made according to users' preferred languages.
- You will only see the languages that have been enabled in PolicyTech™.
|
- The Master/Copy Mode setting determines to what extent Properties Wizard settings and assignments, and questionnaires in localized copies are controlled by the master document. In the Master/Copy Mode list, click an option. See About Sync Modes for detailed descriptions.
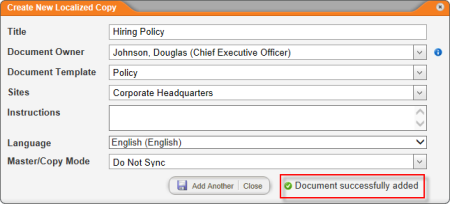
- Click Add. The Create new localized copy window stays open and a message stating that the copy has been added is briefly displayed.
- Do one of the following:
- To add another copy, modify the title, instructions, and settings as necessary, and then click Add Another.
Note: Clicking Add Another immediately adds a copy using the current settings. So, if you don't make changes to the settings, clicking Add Another adds another copy with the same settings as the previously added copy.
- To stop adding copies, click Close.
- (Optional, but recommended) Follow the instructions in Sync Master and Copy Publication Dates.
Assign Existing Documents as Localized Copies
You can connect any existing draft document to a master document.
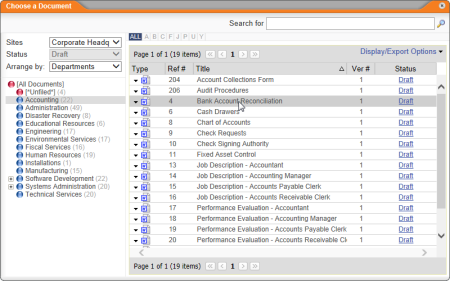
- In the Localization Workflow step of the master document, click Connect an Existing Document.
- Use any available tools to display a list of documents that includes the one you want to connect, and then click the document.
A confirmation window is displayed.
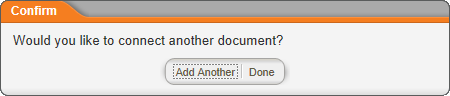
- Do one of the following:
- To connect another draft document, click Add Another, and then repeat step 2 above.
- Click Done.
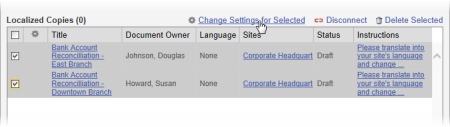
- To configure the Master/Copy Mode setting for the newly connected documents, in the Localized Copies list, select the check boxes of one or more documents, and then click Change Settings for Selected.
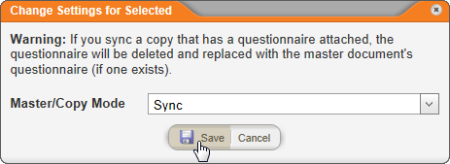
- The Master/Copy Mode setting determines to what extent Properties Wizard settings and assignments, and questionnaires in localized copies are controlled by the master document. In the Master/Copy Mode list, click an option (see About Sync Modes for detailed descriptions), and then click Save.
- (Optional, but recommended) Follow the instructions in Sync Master and Copy Publication Dates.